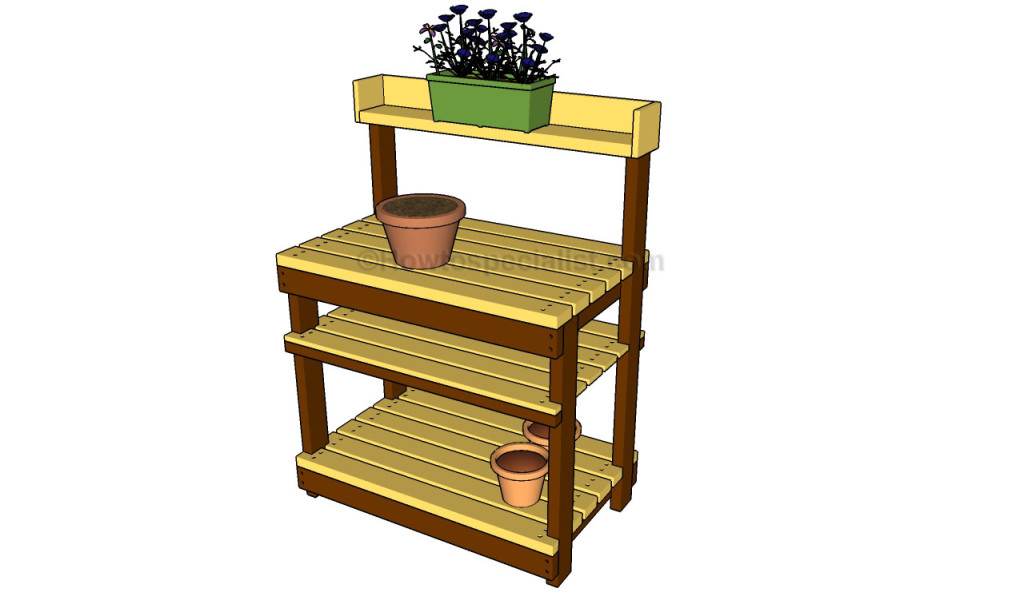
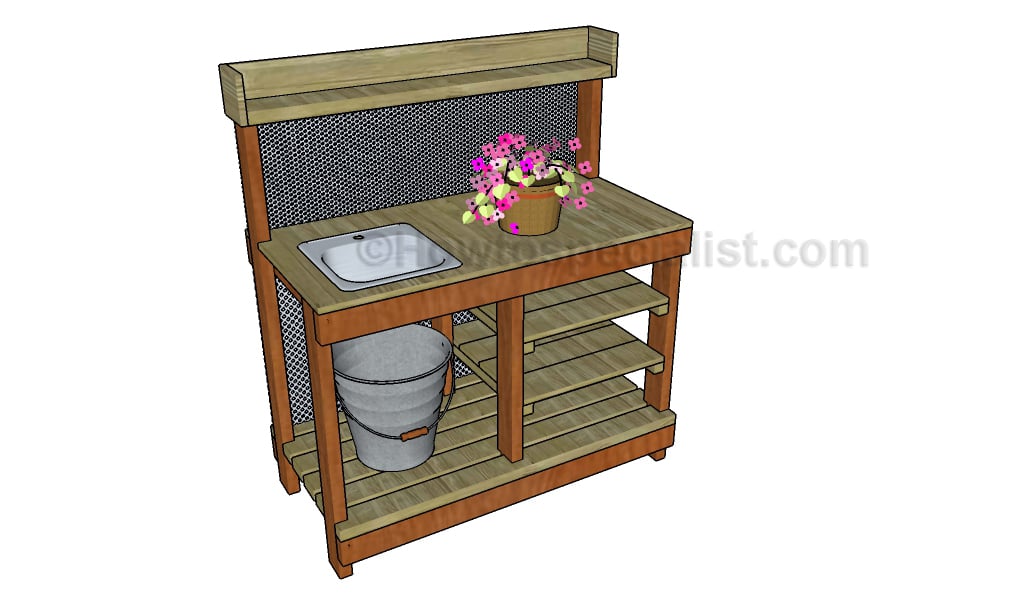
This step by step project is about how to build a potting bench. Building a garden potting bench will make your work easier when taking care of your plants, but you need to pay attention to several aspects. Taking into account the complexity of the project, any person with basic woodworking skills can get the job done. There are many designs and plans that you could choose from, so you should take into account all the alternatives before starting the actual construction.
When building a potting bench you should take into account several aspects, especially if you want to get a professional result. First of all, we recommend you to buy quality materials that are weather-resistant (cedar, pine or pressure-treated lumber). Use a good circular saw to cut the lumber at the right size and smooth the edges with medium-grit sandpaper, before locking them into place with screws.
Always align the wooden components at both ends and check if the corners are right-angled. In addition, you need to plumb the posts and check if the shelves are horizontal, by using a good spirit level. Drill pilot holes trough the components to prevent the wood from splitting. Moreover, you could add waterproof glue to the joints, if you want to enhance the rigidity of the frame. See all my Premium Plans in the Shop.
Made from this plan
Building a potting bench
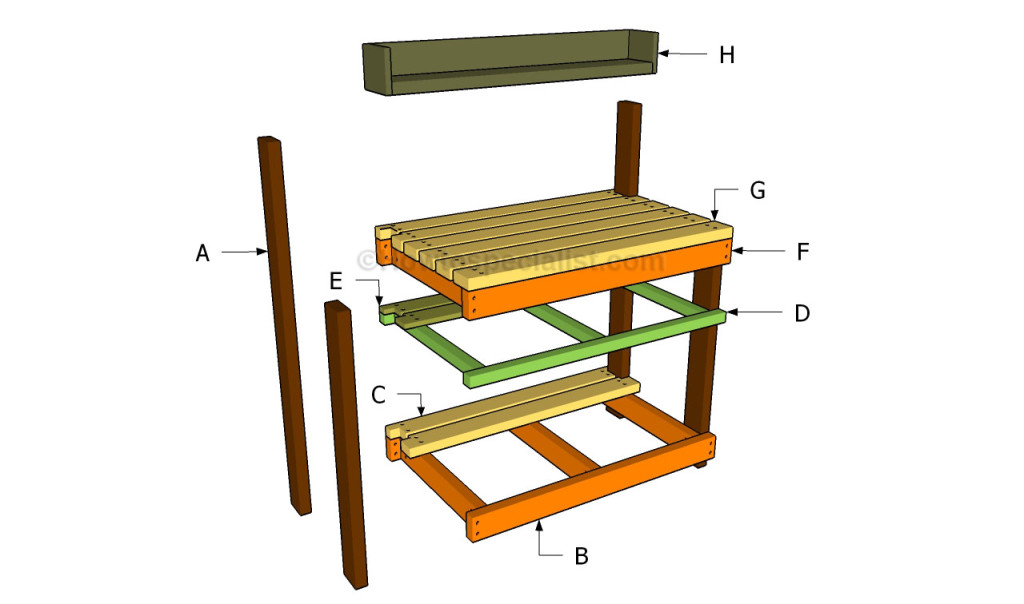
Building a potting bench
Materials
- A – 2 pieces of 2×4 lumber – 35” long, 2 piece of 2×4 – 50” long POSTS
- B – 2 pieces of 2×4 lumber – 40″ long, 3 piece of 2×4 – 22” long FRAME
- C – 6 pieces of 2×4 lumber – 40″ long SLATS
- D – 2 pieces of 2×2 lumber – 40″ long, 3 piece of 2×2 – 22” long FRAME
- E – 6 pieces of 1×4 lumber – 40″ long SLATS
- F – 2 pieces of 2×4 – 40′ long’, 3 piece of 2×4 – 22” long FRAME
- G – 6 pieces of 2×4 lumber – 40″ long SLATS
- H – 1 piece of 2×4 lumber – 40″, 1 piece of 1×6 – 40″, 2 pieces – 6 1/4″ SHELF
- 13 pieces of 2×4 lumber – 8 ft
- 2 pieces of 2×2 lumber – 8 ft
- 3 pieces of 1×4 lumber – 8 ft
- 2 1/2″ screws
- 1 1/4″ screws
- glue, stain
- wood filler
Tools
- Safety gloves, glasses
- Miter saw, jigsaw
- Chalk line, tape measure, spirit level, carpentry pencil
- Drill machinery and drill bits
Tips
- Apply several coats of wood stain to the wooden components
- Fill the holes with wood filler and smooth the surface
Time
- One Day
Related
How to build a potting bench
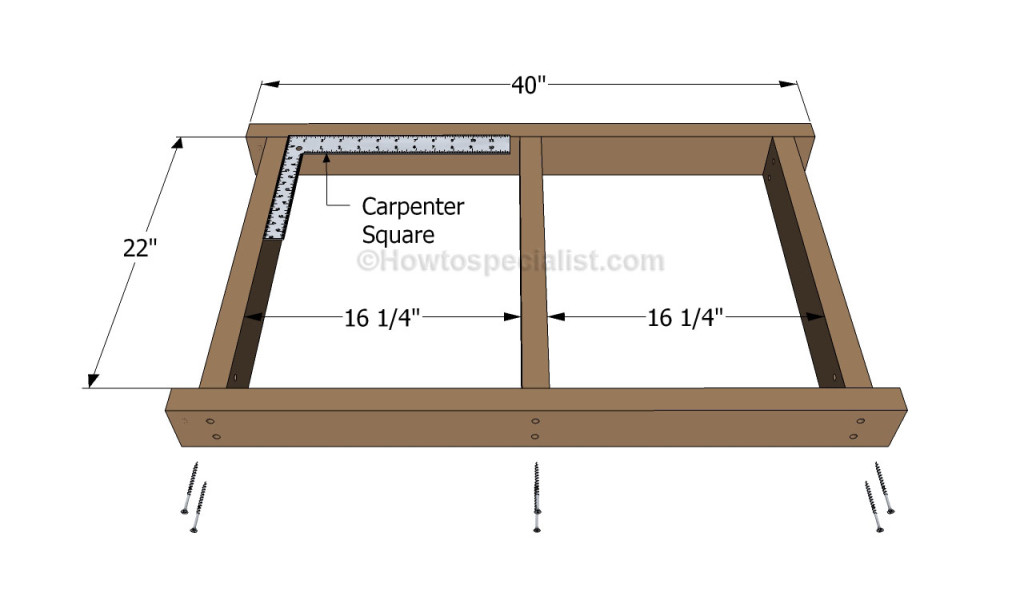
The first step of the project is to build the bottom frame of the potting bench. As you can see in the image, you need to make the frame using 2×4 lumber. After cutting the wooden pieces at the right size, you need to drill pilot holes and insert 3 1/2″ galvanized screws. Make sure you countersink the head of the screws and check if the corners are right-angled with a carpentry square.
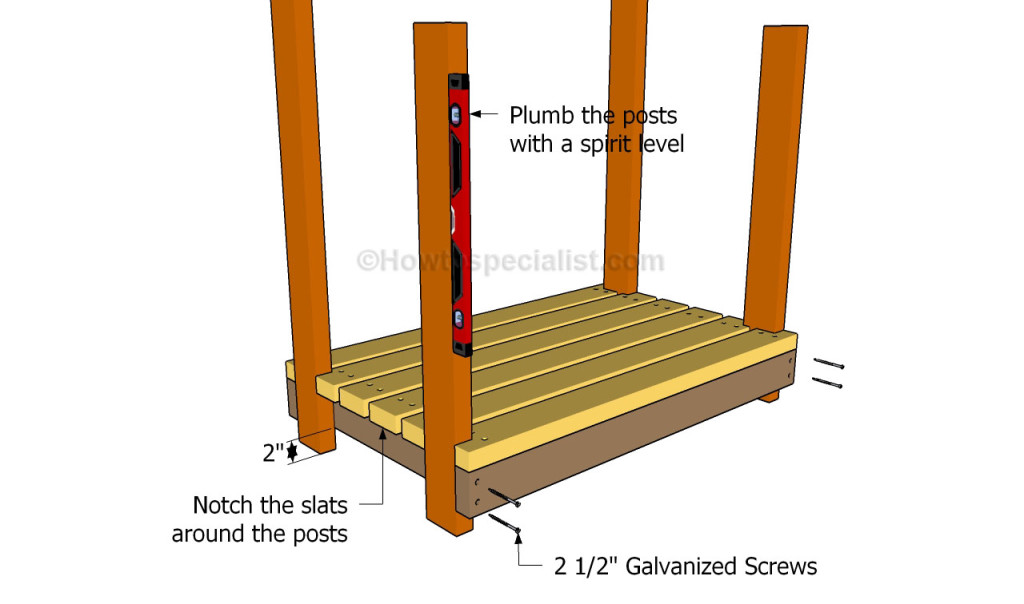
Attach the 2×4 posts to the bottom frame, leaving at least 2″ from the ground. Drill pilot holes trough the posts and insert 2 1/2″ wood screws into the bottom frame, after plumbing them with a spirit level. Cut the front posts at 35″ and the back posts at 50″.
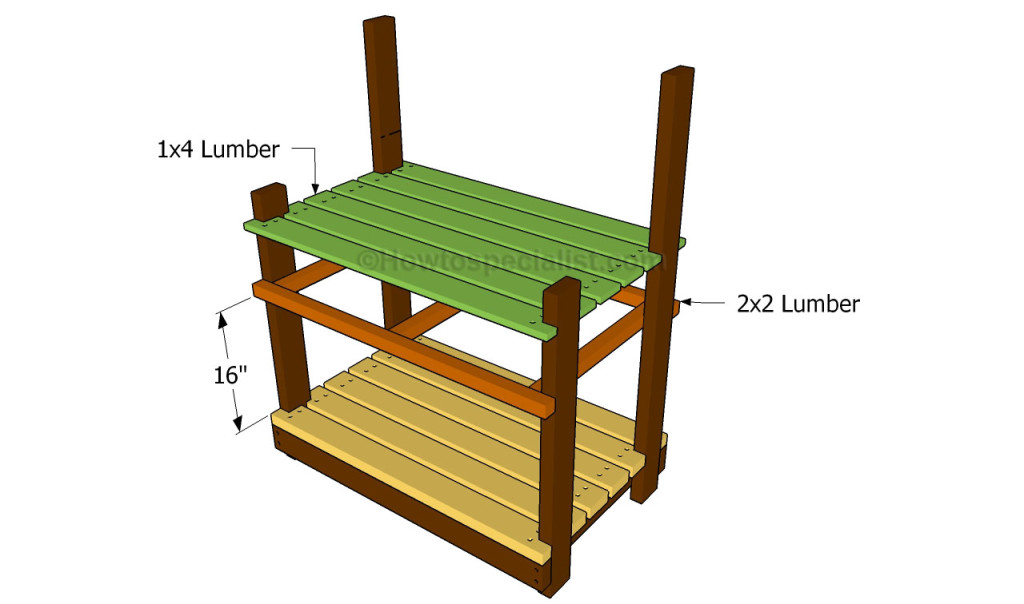
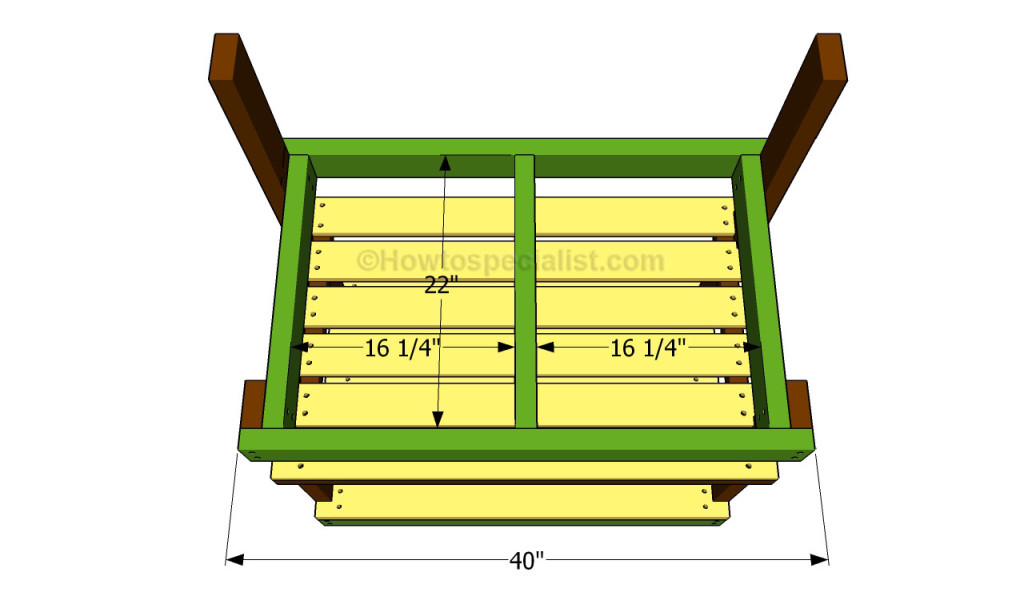
The next step of the woodworking project is to build the middle shelf. As you can easily notice in the plans, we recommend you to build the frame from 2×2 lumber and to attach 1×4 slats. We recommend you to align the components at both ends and to level them with a spirit level, before drilling pilot holes and inserting galvanized screws.
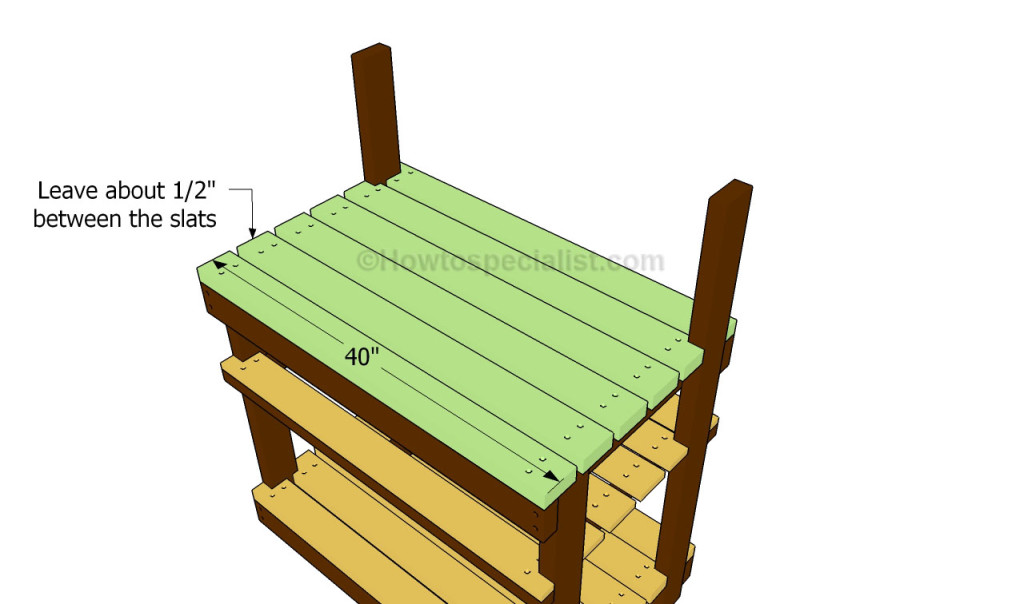
Build a sturdy tabletop especially if you want to lay heavy objects on the potting bench. Therefore, build the frame from 2×4 lumber, as in the plans, and attach 2×4 slats. Make sure the posts are perfectly plumb and the corners are right-angled, before inserting the galvanized screws. Add waterproof glue to enhance the bond of the joints.
As we have already pointed out, you need to attach 2×4 slats to the frame and to lock them into place with 2 1/2″ galvanized screws. Place a small block of wood between the slats, in order to get even gaps and consistent results. Cut small notches in the slats that are fitted around the back legs.
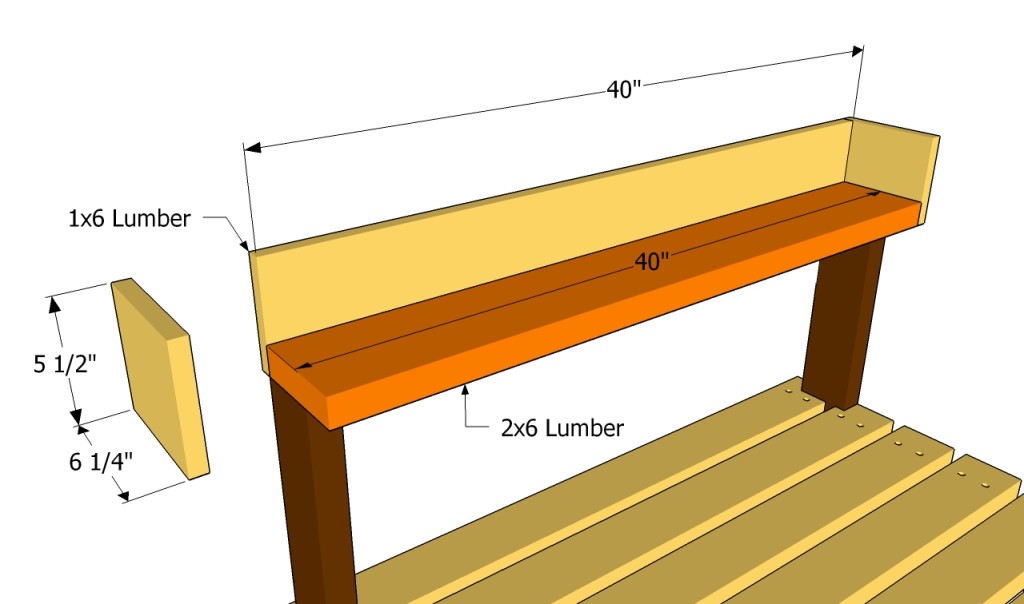
If you want to create additional storage space for your potting bench, we recommend you to attach a small shelf to the top of the back legs. Use 2×6 and 1×6 lumber to build the shelf, as in the image. Align the components at both ends and lock them into place with galvanized screws.
Last but not least, we recommend you to take care of the finishing touches. Fill the holes with wood filler and let it to dry out for several hours. Afterwards, smooth the wooden surface with fine-grit sandpaper and vacuum the residues.
Thank you for reading our project about how to build a potting bench and we recommend you to check out the rest of the projects. Don’t forget to LIKE and SHARE our projects with your friends, by using the social media widgets. SUBSCRIBE to be the first that gets our latest updates.




I just made this potting bench and it turned out amazing. I’m a bit tall so I added 3″ to the 2×4 posts so the top shelf is at elbow level for me. Fantastic, sturdy potting bench using easy to find lumber at any big box hardware store. A good, light stain and seal will make it last for a long time.