
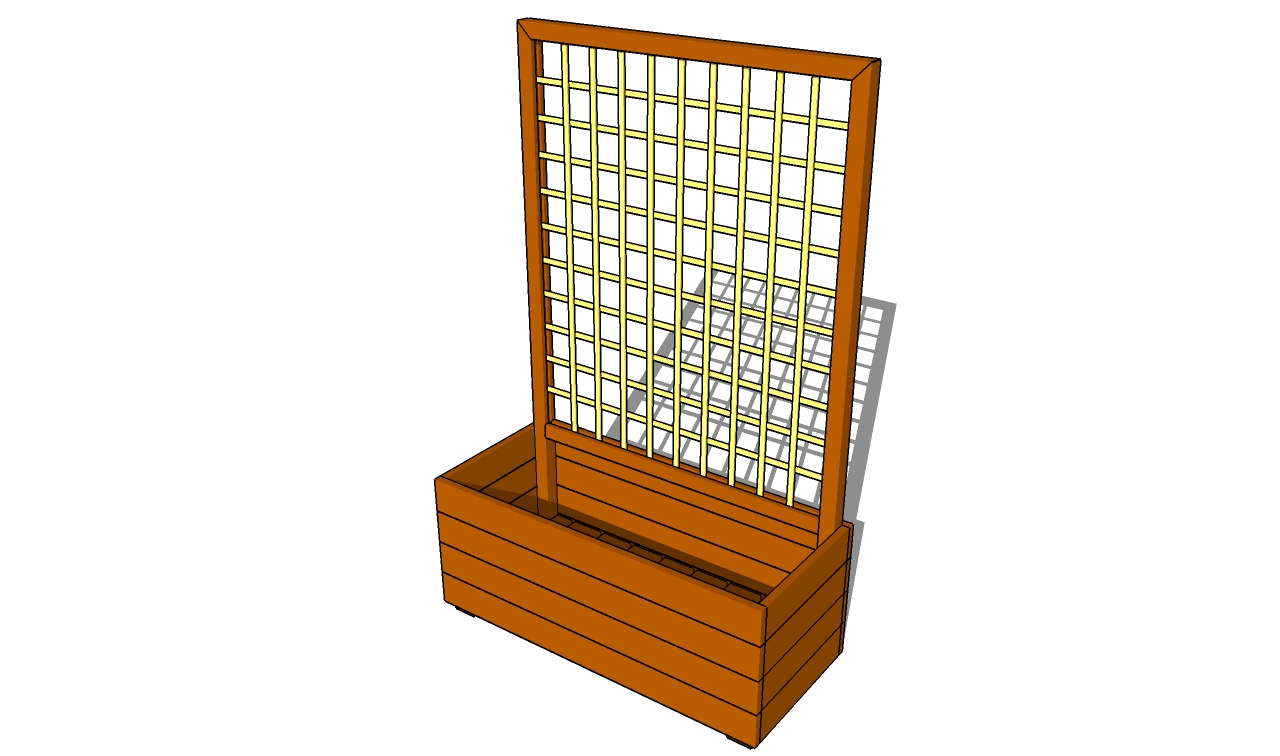
This step by step diy project is about how to make a flower box. Building a wooden planter with trellis is a nice weekend project if you want to grow climbing plants or need a simple privacy screen for your garden. The instructions are straight-forward and any person with basic woodworking skills can get the job done, if the right tools, techniques and materials are used.
You should always choose proper plans that fit your needs and tastes. Nevertheless, if this project doesn’t fit your needs you could either adjust its size and design or check out the rest of the planter plans. On the other hand, you also have to choose quality materials for your planter box, such as cedar, redwood or pine, as these are both water-resistant and have a beautiful natural finish.
There are several woodworking techniques you should pay attention to, if you want to get the job done as a professional. Always pre-drill the wooden components before inserting the galvanized screws, to prevent the wood from splitting. In addition, align the components at both ends before locking them together. Fill the holes with wood putty and sand the surface with medium-grit sandpaper. See all my Premium Plans in the Shop.
Made from this plan
In order to build a flower box, you need to use the following:
Materials
- A – 4 pieces of 2×4 lumber – 3″ long LEGS
- B – 8 piece of 1×4 lumber – 36” long, 8 pieces – 14 1/2″ long SLATS
- C – 2 pieces of 2×2 lumber – 29 3/4″, 9 pieces of 1×4 – 14 1/2″ long BOTTOM
- D – 2 pieces of 2×2 lumber – 51 1/2″, 1 piece – 31 1/2″, 1 piece – 34 1/2″ FRAME
- E – 11 pieces of 1×2 lumber – 32 1/2″, 12 pieces of 1×2 lumber – 39 1/2″ TRELLIS
- 12 pieces of 1×2 lumber – 8 ft
- 1 piece of 2×4 lumber – 1 ft
- 6 pieces of 1×4 lumber – 12 ft
- 2 pieces of 2×2 lumber – 8 ft
- 2 1/2″ screws
- 1 1/4″ screws
- glue, stain
- wood filler
Tools
- Safety gloves, glasses
- Miter saw, jigsaw
- Chalk line, tape measure, spirit level, carpentry pencil
- Drill machinery and drill bits
Tips
- Apply several coats of wood stain to the wooden components
- Adjust the size of the flower box, according to your needs
Time
- One Day
Related
Building a flower box

Building a flower box
How to make a flower box

Building the flower box
The first step of the woodworking project is to build the flower box. As you can see in the plans, you should use 1×4 tongue and groove boards and lock them together with screws. Drill pilot holes at both ends of the components and drive in 2 1/2” wood screws.
In addition, fit the 2×4 legs to the four corners of the flower box, in order to raise it several inches from the ground.

Installing the bottom of the box
Afterwards, you should fit the 2×2 cleats between the legs of the planter and secure them to the side walls with 2″ galvanized screws. Don’t forget to pre-drill the lumber, in order to prevent the wood from splitting.
Continue the woodworking project by fitting the bottom slats. Drill pilot holes at both ends of the 1×4 slats and insert 1 1/2″ wood screws. Leave about 1/4″ to 1/2″ between the slats.

Building the frame of the trellis
The next step of the project is to build the frame of the trellis. As you can see in the image and plans, you should use 2×2 lumber. Cut a 1/2 x 1/2″ channel inside the interior faces of the components, using a router.

Fitting the trellis inside the channels
Build the trellis on a level surface, if you want to get a professional result. Secure the components (1×2 – 1/4″ thick) together with 1/2″ screws. Check if the components are equally-spaced before driving in the screws.

Installing the trellis
Fit the trellis inside the flower box and lock them to the slats with several 2″ galvanized screws. Use a spirit level to plumb the trellis before driving in the screws.
Work with great attention and good judgement, if you want to get a professional result. You could always adjust the size of the trellis, as to fit your needs and tastes.

How to make a flower box
Last but not least, you should take care of the finishing touches. Therefore, if you want to get the job done as a professional, you need to fill the holes with wood filler and sand the surface, after the compound dries out. Apply a few coats of stain to protect the wood from decay.

Thank you for reading our project about how to build a a flower box and we recommend you to check out the rest of the projects. Don’t forget to share our projects with your friends, by using the social media widgets.

