This diy step by step article is about playhouse plans free. In this project we show you how to build an outdoor playhouse for your kids, using common materials and tools. Beside buying an expensive kit, you have a cheaper alternative: to undertake the construction process as a do it yourself project. In order to obtain a professional result, you should use the right plans for your needs, cut the components at the right size with proper tools and install them into place accurately. Don’t forget to align and plumb the components before locking them into position, if you want to obtain a professional appearance.
We have designed the outdoor playhouse in such a manner as to be easy to build by virtually any person. Therefore, you should notice that you have to use pressure treated lumber and plywood sheets of different thicknesses, as well as common tools to build the components. If you pay attention to the safety of your children and use the right techniques, the playhouse will have a nice appearance and your kids will enjoy it more than you can imagine.
In order to build a playhouse with our free plans, you should use several power tools, such as a jigsaw, a circular saw, a drill machinery and a sander. Nevertheless, even if you haven’t done any project with similar complexity, you could get the job done easily if you follow our step by step tutorial. Use a straight edge to draw the cut lines and make sure you use power tools with a sharp blade. In addition, you have to take accurate measurements before building the wooden components of the playhouse. See all my Premium Plans in the Shop.
Made from this plan
Materials
- A – 4 pieces of 2×6 lumber 72” long JOISTS
- B – 2 pieces of 2×6 lumber 48” long RIM BEAMS
- B – 21 pieces of 2×4 lumber 48” long FLOOR
- C – 8 pieces of 2×4 wooden studs 53 1/2” long, 2 pieces – 66 1/2″, 1 piece – 65″ WALL STUDS
- D – 2 pieces of 3/8 grooved plywood 4’x8′(cut the top at 30º on both sides), 3 pieces – 4’x8′ FRONT END
- E – 4 pieces of 2×4 lumber 30” long RAFTERS
- F – 4 pieces of 2×4 lumber 65” long RAFTERS
- G – 2 pieces 3/4” plywood – 30″x75″ ROOFING SHEETS
- H – 60 sq ft tar paper
- J – 60 sq ft asphalt shingles
- K – 1×3 lumber TRIM
- L – 1×4 lumber FASCIAS
- 5 pieces of 2×6 lumber – 8 ft
- 5 pieces of 3/8 grooved plywood 4’x8′
- 18 pieces of 2×4 lumber – 8 ft
- 5 pieces of 2×4 lumber – 10 ft
- 2 pieces 3/4” plywood – 4’x8′
- 60 sq ft tar paper, 60 sq ft asphalt shingles
- 2 1/2″ screws
- 1 1/4″ screws
- glue, stain
- wood filler
Tools
- Safety gloves, glasses, Miter saw, jigsaw
- Chalk line, tape measure, spirit level, carpentry pencil
- Drill machinery and drill bits, Router, 1/4” round bit – optional
Tips
- Smooth the edges of the wooden boards, with a router
- Pre-drill holes in the wooden components, before driving in the screws
- Align the components before locking them into place
- Use a nail between the decking boards, to obtain consistent gaps
Time
- One weekend
Related
Playhouse Plans Free
How to build a playhouse plans free
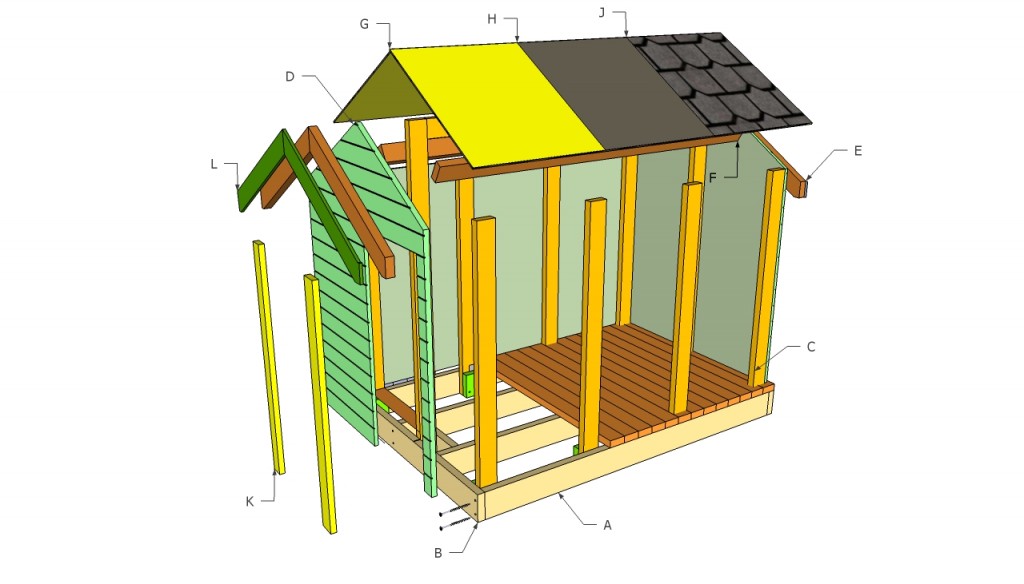
An outdoor playhouse is a fun project for any do-it-yourself amateur, as it is an opportunity to learn new carpentry techniques and create something unique for your kids. As you can see in the image, you have to build several components and lock them together with appropriate screws.
We have designed a simple playhouse, easy to build by anybody who knows how to use several power tools and take measurements. Just follow our step by step instructions and try to work with attention when taking measurements and when cutting the components.
How to Build a Playhouse Plans Free
Playhouse floor plans
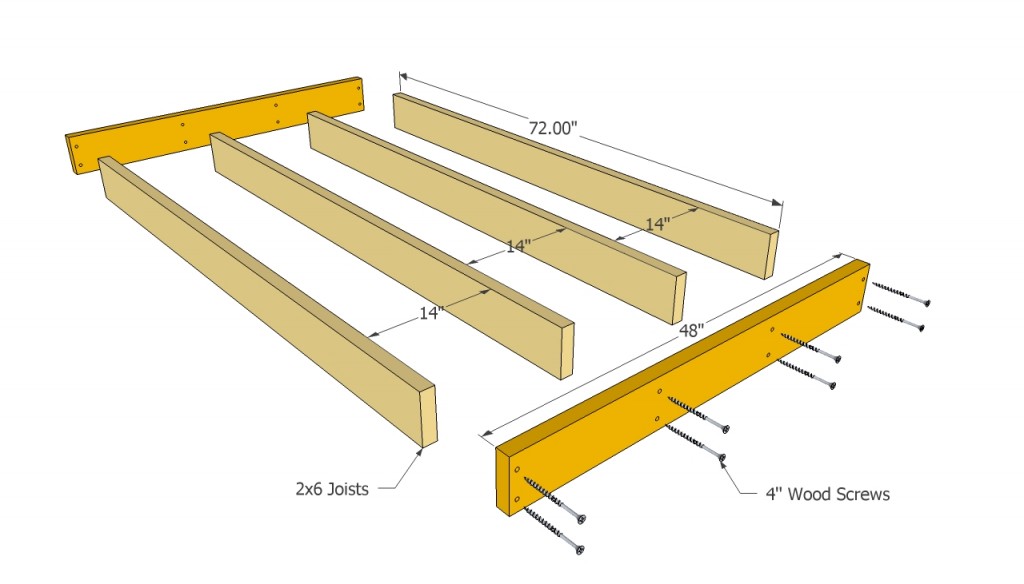
The first step of this project is to build the frame of the construction. Therefore, you should join together several 2×6 (or 2×4) joists, as in the image. Choose a horizontal surface to build the playhouse, as you don’t need to pour footings.
Building the wall studs
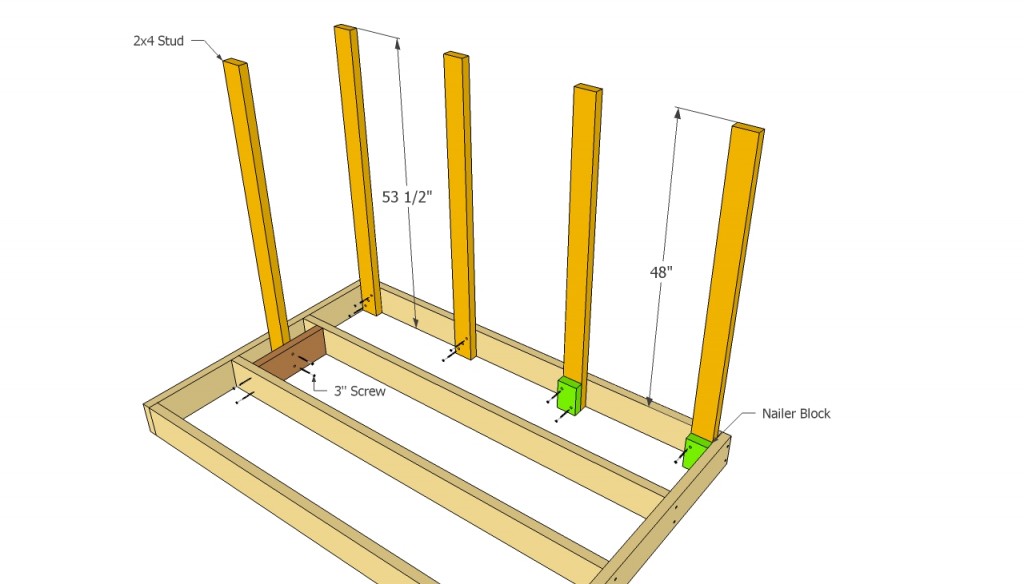
Next, you have to build the 2×4 studs and lock them into position with 3” screws. In addition, you have to build nailer blocks and install them to the wooden posts with 3” wood screws (the will support the decking slats).
Plumb the studs with a spirit level and place them equally spaced, as in the image. Work with great care, making sure the top of the studs are aligned and level.
Installing the decking boards
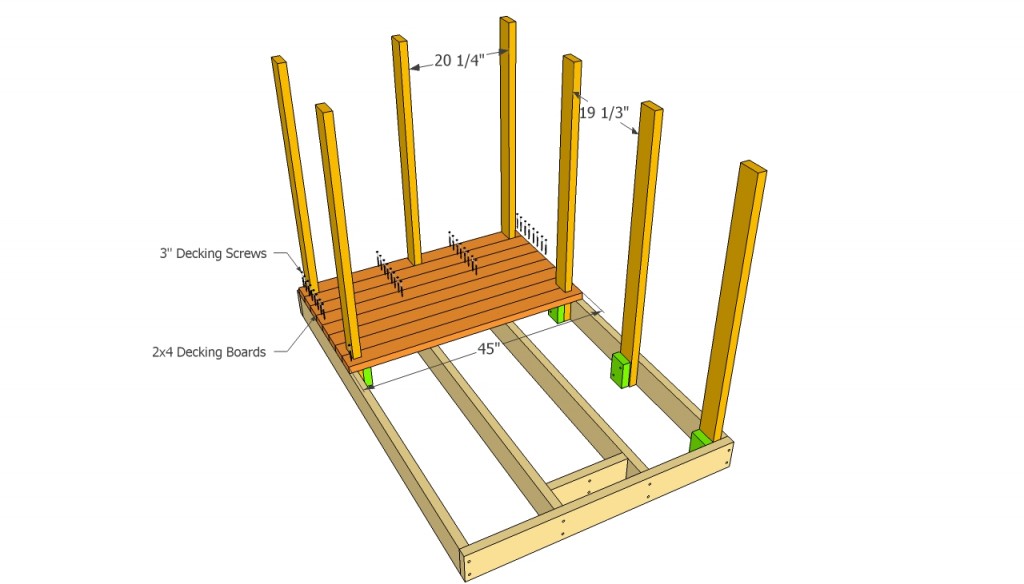
After you have built the floor frame and installed the studs, you should attach the 2×4 decking boards. As you can see in the image, you have to notch the 2×4 boards around the studs, using a circular saw. Set the blade at the right depth, make multiple cuts and clean the recess with a chisel.
Use 3” decking screws to lock the slats into place, after aligning them at both ends. Use a small nail to obtain even gaps between the decking boards.
Installing the ridge
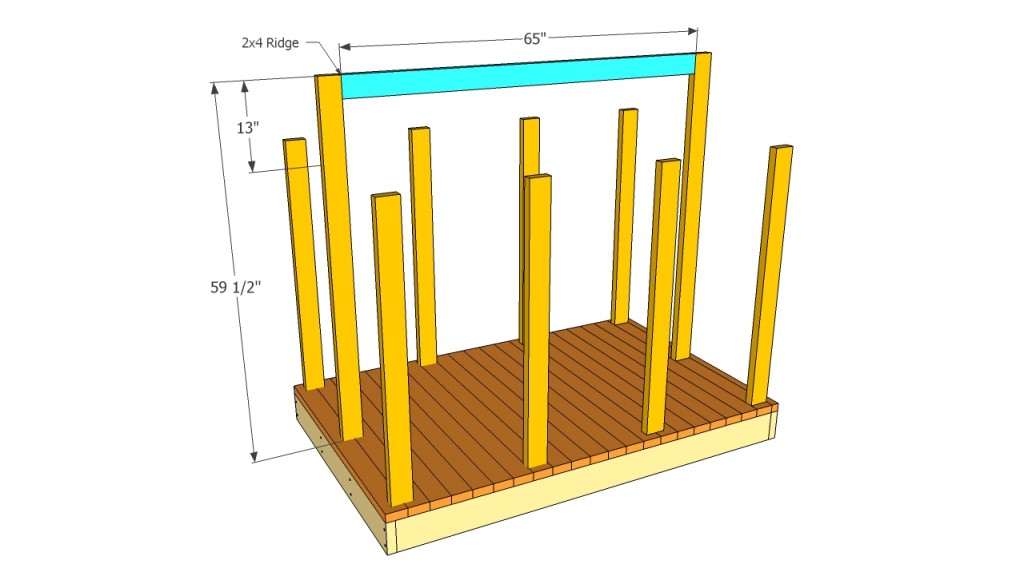
As you can see in our free plans, the center studs should be longer than the rest of the studs, in order to obtain a gable roof with 30º slope. Align the ridge and use a spirit level to make sure it is perfectly horizontal.
After you have completed this operation, install the top ridge into place and secure it with 3” screws (toenail the ridge from both sides). Moreover, you can increase the rigidity of the structure by using metal hardware.
Building the front ends of the playhouse
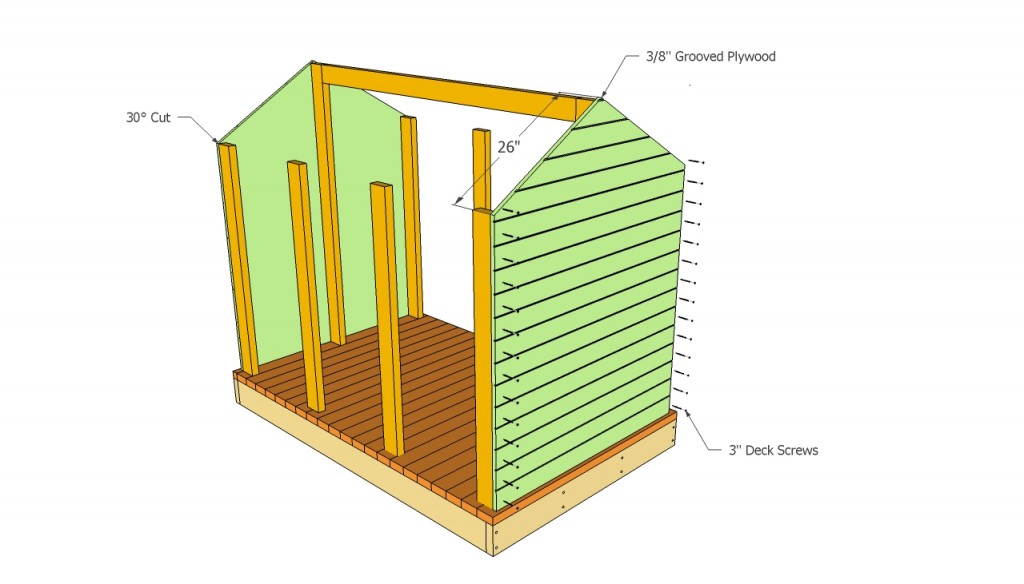
Next, build the front and back ends of the playhouse from 3/8 grooved plywood. In order to get the job done like a pro, we recommend you to place the plywood sheet on the ground, mark the outline with a straight edge and cut along the guidance lines with a circular saw.
Place the component into place and drive in 3′ screws along the studs, every 10”. Pay attention to this procedure, to obtain a durable construction.
Playhouse roof plans free
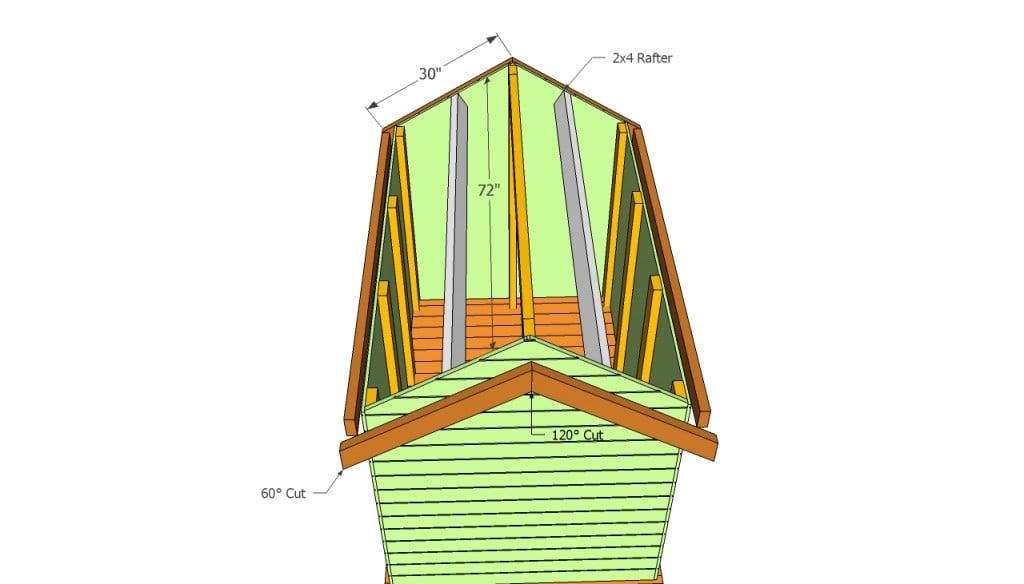
Next, you have to build the sides of the outdoor playhouse and secure them in the same manner described above. Afterwards, you have to attach the rafters and the roof supports.
Therefore, attach the rafters with deck screws from the inside and place the 2×4 supports as in the image. Leave at least 1” from the edges, to prevent the wood from splitting. Align the supports properly, otherwise you won’t be able to install the roofing sheets.
Installing the roof
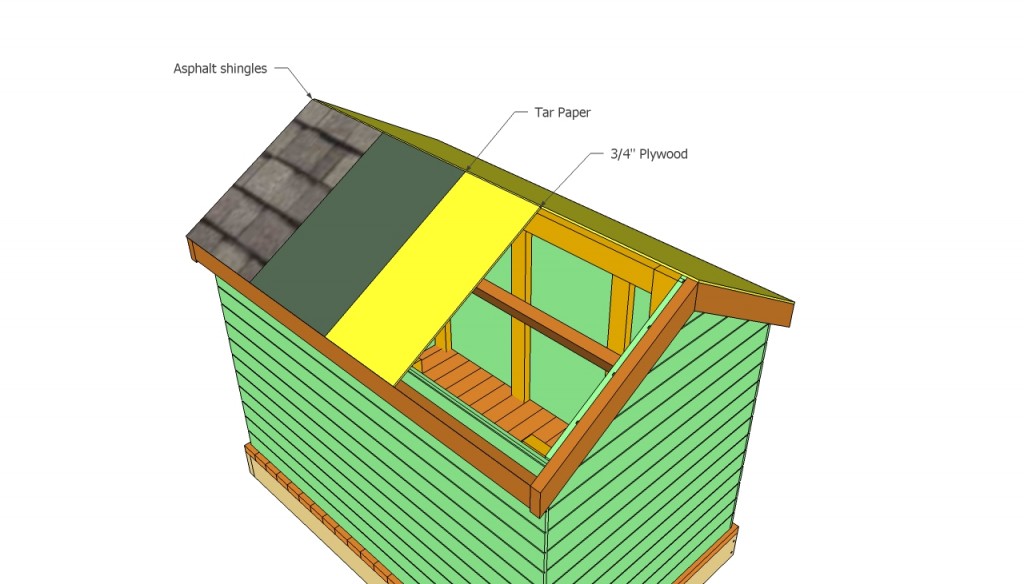
Install 3/4 tongue and groove plywood sheets and secure them with galvanized decking screws. Checking the corners for squareness.
Next, cover the roof with tar paper and staple it every the 10”. Install the asphalt shingles starting with the bottom of the roof. The shingles should overhang the edge of the roof by at least 1/2, to drain water properly. Secure the shingles with a nail gun, using 1 1/4 roofing nails.
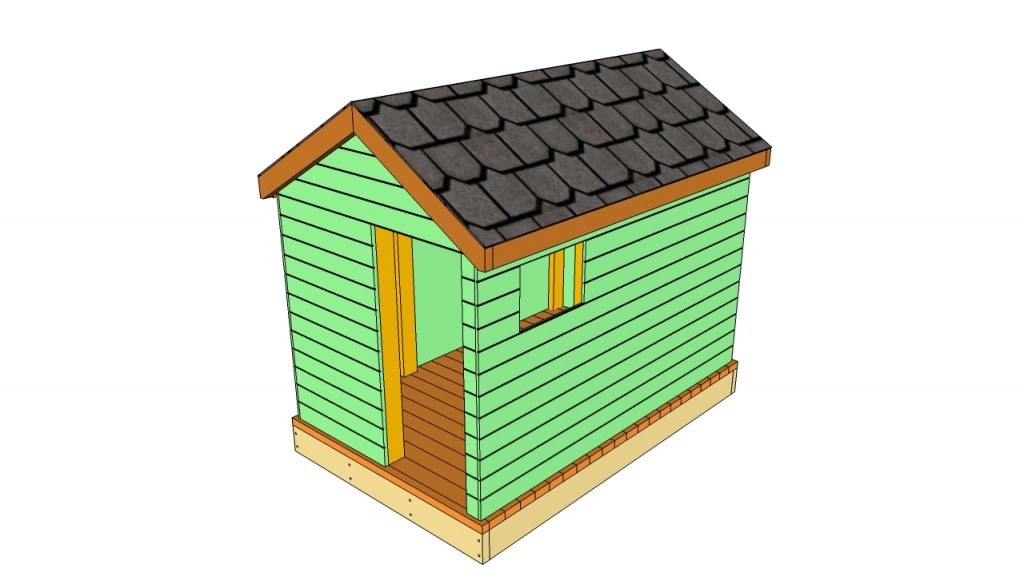
Cutting out the door and windows
Cut the door and the windows with a circular saw, along the wooden studs. You can adjust the size of the door and windows according to your tastes and needs, making sure they are positioned along the studs.
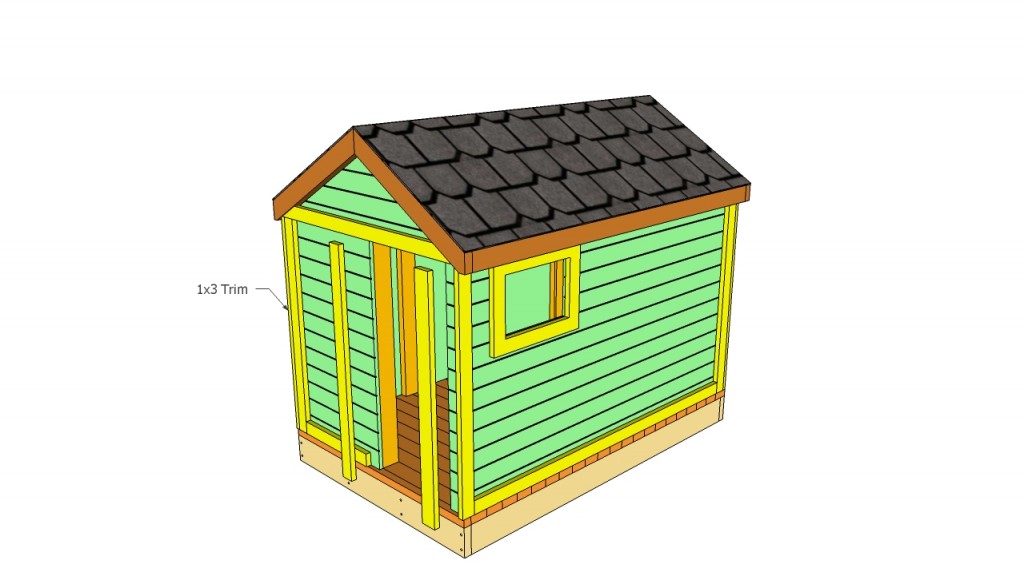
Installing the wooden trim
Next, install 1×3 trims along the corners of the outdoor playhouse, as in the image. There are many design you could choose from, therefore use your creativity to make the playhouse unique.
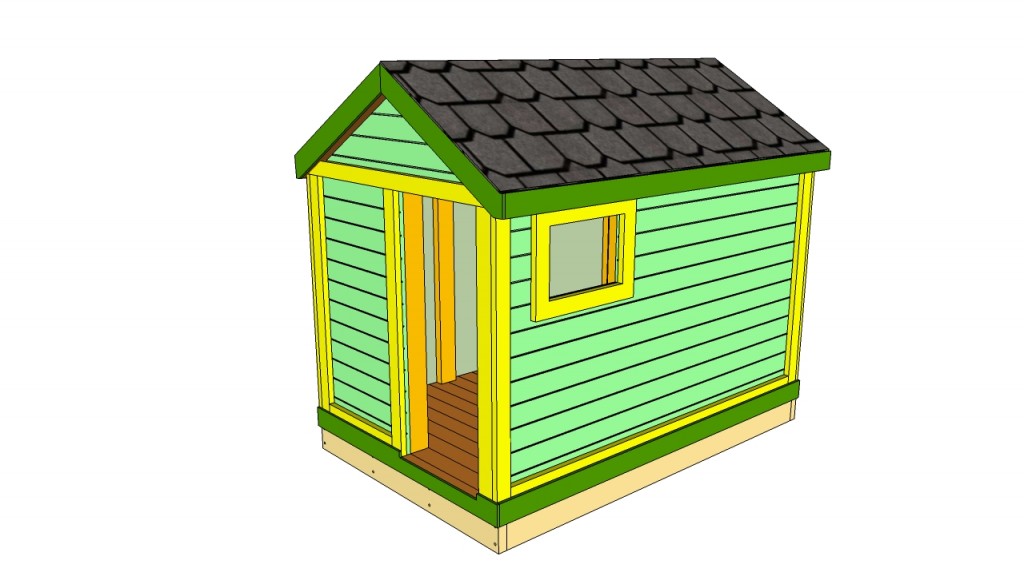
Playhouse plans free
Next, install the 1×4 fascias and finish the wooden surface with medium grit sand paper. Don’t forget to fill the cracks with wood putty or with a good sealant. Round the sharp edges with a sander, otherwise the children might easily injure themselves.
Thank you for reading our article about playhouse plans free and we recommend you to check out the rest of our projects. Don’t forget to share our articles with your friends, by using the social media widgets.

3 comments
How do I get the plans for this?
It’s only available online
Is there an actual lumber list for this? The list on here is confusing