
This step by step article is about how to build a lean to shed. If you want to enhance the storage space and you don’t pay attention to exquisite design, a lean to shed is the solution to your needs. In addition, if you don’t have a large backyard or you want to keep costs under control, you could attach the shed to an existing building, such as your house or a garage. This project can be done in just an weekend by any person with basic woodworking skills, if the right plans are used.
The design of the attached shed is straight forward, as you don’t need to build a complex and costly foundation. Using a pair of 4×4 skids is enough to support the weight of the construction, if you attach it to another building. On the other hand, if you want to build a free-standing construction, you need to use several concrete piers or pour several concrete footings.
Select the lumber with great care and attention, if you want to obtain a professional result. Therefore, you need to buy lumber designed for outdoor use, making sure the beams are perfectly straight and don’t have any visible flaws, such as decay, twists or chips. Pre-drill the lumber before inserting the screws, at least 1/2” from the edges, in order to prevent the wood from splitting. See all my Premium Plans in the Shop.
Made from this plan
In order to build a lean-to tool shed, you need the following:
Materials
- 2 pieces of 2×4 lumber – 6 ft, 6 pieces – 45″ long, 2 pieces of 4×4 lumber – 6 ft FRAME
- 1 piece of 3/4” OSB or plywood – 4’x6′ FLOORING
- 2 pieces of 2×4 lumber – 12″, 1 piece – 6 ft, 6 pieces – 81″, 3 pieces – 7″, 2 pieces – 48″ FRONT WALL
- 2 pieces of 2×4 lumber – 6 ft, 5 pieces – 8 ft BACK WALL
- 2 pieces of 2×4 lumber – 41″, 3 pieces – 81″ 2xSIDE WALL
- 5 pieces of 2×4 lumber – 52″ RAFTERS
- 2 pieces of 1/2” tongue and groove slats – 37 1/2″x52 1/4″ ROOFING
- 2 pieces of 1×4 and 1×3 lumber – 8 ft TRIMS
- 2 1/2” screws DECKING SCREWS
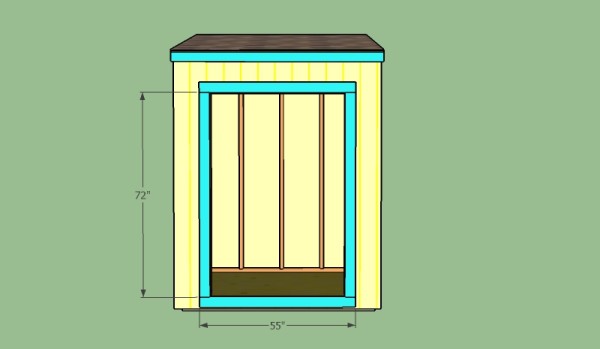
- 2 pieces of 1×4 lumber – 55″, 2 pieces – 72″ DOOR JAMBS
- 2 pieces of T1-11 siding – 24″x72″, 4 pieces of 1×4 lumber – 67″, 4 pieces – 24″, 2 pieces – 19″ DOORS
- Roofing felt, Asphalt shingles
- Hinges, latch
- 2 1/2″ screws
- 4 pieces of 5/8″ T1-11 siding – 4’x10′
- 4 pieces of 5/8″ T1-11 siding – 4’x8′
- hinges
- 2 pieces of 1/2″ plywood – 4’x8′
- 1 piece of 3/4″ plywood – 4’x8′
- 23 pieces of 2×4 lumber – 8 ft
- 3 pieces of 2×4 lumber – 10 ft
- 6 pieces of 1×4 lumber – 8 ft
- 6 pieces of 1×3 lumber – 8 ft
- rafter ties
- 2 1/2″ screws
- 1 1/4″ screws
- glue, stain
- wood filler
Tools
- Safety gloves, glasses
- Miter saw, jig saw
- Chalk line, tape measure, spirit level, carpentry pencil
- Drill machinery and drill bits
Tips
- Pre-drill holes in the wooden components, before driving in the screws
- Countersink the head of the screws
- Don’t use lumber that is likely to crack or shrink
- Don’t over-tighten the screws to prevent the wood from splitting
Time
- One weekend
Building an attached shed

Building a lean to shed
Building a lean to shed is not difficult, if you use the right carpentry techniques and woodworking plans. This simple shape has many advantages, as it provides a significant storage space, while keeping the expenditures at a low level.
How to build a lean-to shed

Build the floor of the lean to shed
The first step of the project is to build the base of the shed. As you can see in the image, the shed will be supported by several 4×4 skid, placed at about 5-10” from the edges.
Build the joists from 2×4 lumber and join them together with 3” wood screws. Drill pilot holes in the lumber, at least 1/2” from the edges, to prevent the wood from splitting. Toe-nail the frame to the 4×4 skids, with 4” wood screws.

Installing the floor of the shed
Measure the diagonals of the frame and adjust their position, until they are equal. In addition, check the for corners for squareness. Afterwards, attach a sheet of 3/4” plywood on the frame and drive in 2” screws, every 5”, along the joists.

Building the front face of the shed
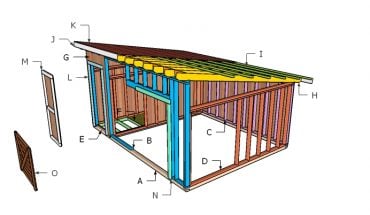
The next step of the project is to build the wall frames on the ground and to install them into position, in a professional manner. As you can see in the image, you to leave enough space for a large door. In addition, reinforce the frame by installing a double header and double jambs.
Plumb the frame with a spirit level, lock it into place with several braces and drive in 3” screws trough the bottom plate in the wooden joists.

Back wall plans
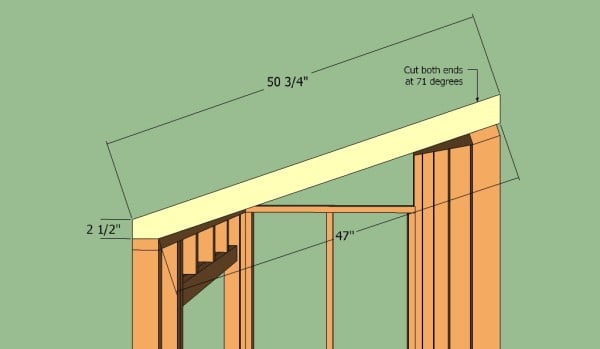
Afterwards, you have to build the back wall of the lean to shed and to install it on the flooring, in the same way described above. As you can see in the image, you have to cut the top of the wall studs at 17.5º, in order to obtain a proper slope for the roof.
Place the wall studs equally spaced, leaving about 16” between them. Secure the wall frame to the floor, by inserting 3” wood screws trough the bottom plate in the joists.

Building the side walls
After building the front and the back wall, install the side frames. Build the wall frames on a sturdy surface, making sure you assemble the structures properly. Insert 3” screws trough the bottom and top plates directly into the wall studs, after pre-drilling several holes.
Make sure the diagonals of the frame are equal, before locking it into place. Reinforce the corner joints of the shed, by inserting 3” wood screws.
Building the rafters
Mark the cut lines on the 2×4 slats and get the job done with a circular saw. Smooth the edges and pay attention to the angle cuts.
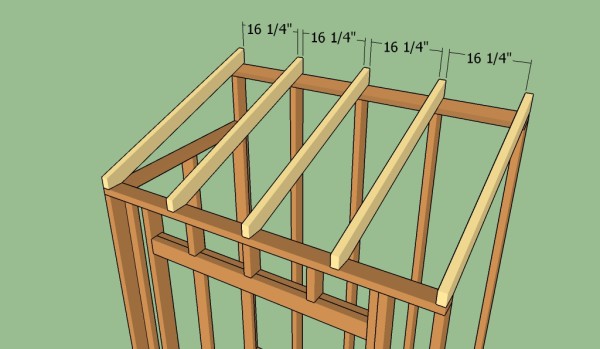
Fitting the rafters
Place the rafters equally-spaced. Drill pilot holes through the rafters and insert 5 1/2″ screws into the top plates. Leave no gaps between the components, for a professional result.

Installing the exterior siding
Continue the woodworking project by attaching the 5/8” grooved siding on the exterior faces of the lean to shed. Use a good saw with a sharp blade to make the cuts, otherwise you might tear the edges of the siding.
Building the roof of the lean-to shed

Installing the roofing sheets
Attach the roofing sheets to the rafters. In order to get the job done properly, we recommend you to attach first 1×4 trims to the edges of the roof. Lock the trims to the frame of the shed, by driving in finishing nails every 10”.
Attach the 1/2” plywood sheets to the rafters and drive in 2” nails, every 10” along the rafters. Use tongue and groove plywood, to ensure a proper connection between the sheets.

Installing the asphalt shingles
Cover the roof of the lean-to shed with roofing felt, before installing the asphalt shingles, starting with the bottom of the roof. The tar paper should overlap at least 2”.
The side drip edges and the top drip edge should be fitted over the tar paper, while the bottom drip edges should be placed under the roofing felt. Install asphalt shingles over the roofing felt, making sure they overhand the edges at least 1/2”.
Fitting the jambs
Fit the 1×4 jambs around the opening. Use brad nails to lock the slats into place.

Building the front doors
Building the door for the shed is a straight forward job, if you use the right carpentry techniques and plans. Firstly, install 1×3 trims on the edges of the door opening and secure them with 1 1/2” nails to the wall studs.

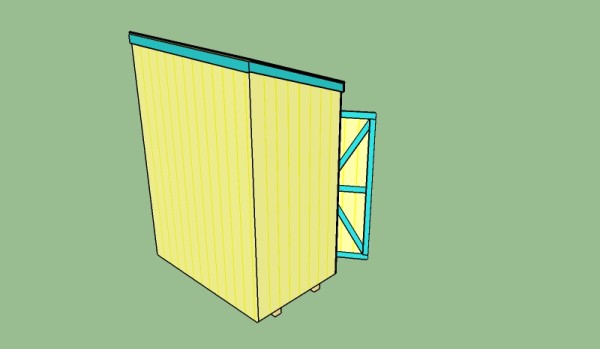
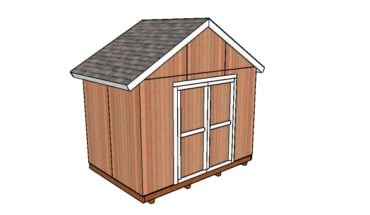
Lean to shed – Side view
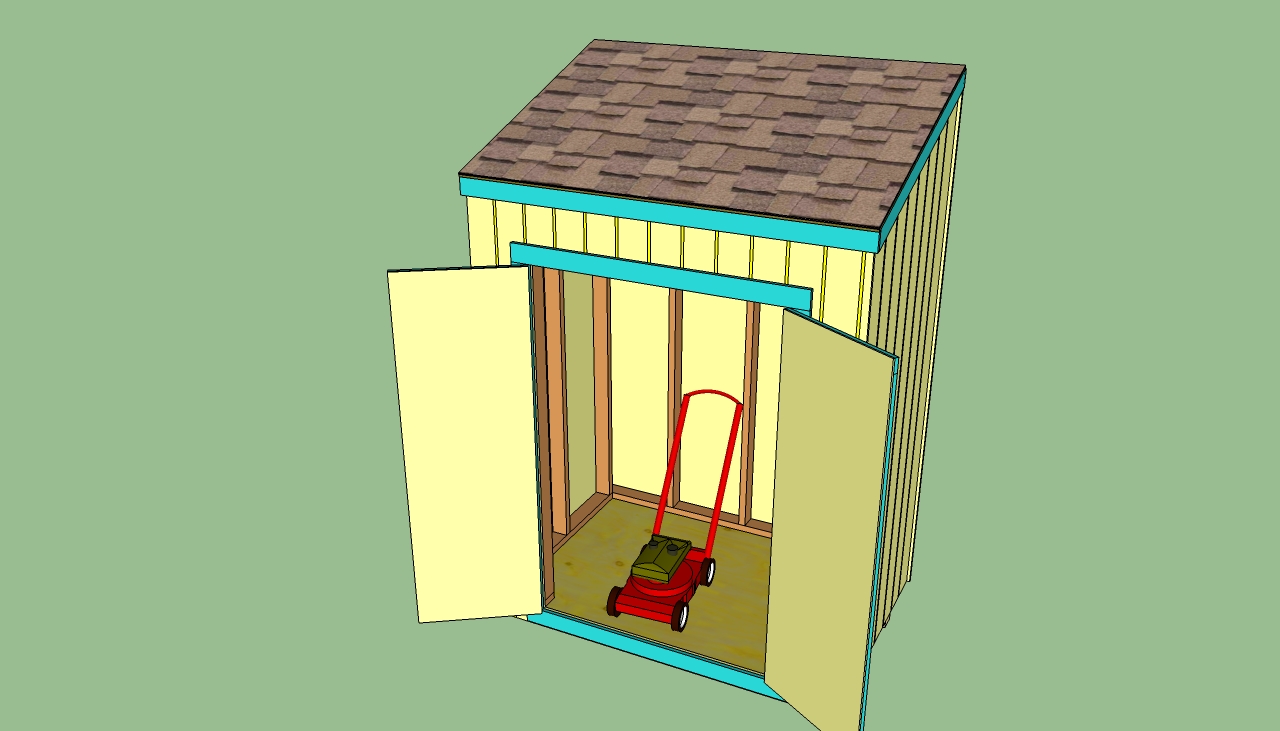
The 4×6 lean to shed seen from one side has a nice appearance.
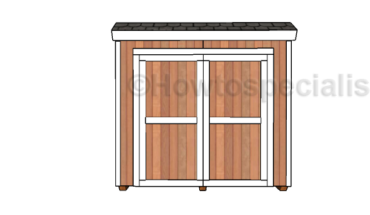
Lean to shed
Building this shed is an ideal choice if you want to store your tools in a stylish manner.

How to build a lean to shed
Last but not least, you should take care of the finishing touches. Therefore, fill the gaps with a good sealer and protect the lumber from rot, by applying several coats of waterproof paint or wood stain.
Thank you for reading our article about how to build a lean-to shed and we recommend you to check out the rest of our projects. Don’t forget to share our projects with your friends and LIKE us, by using the social media widgets, if you want to be the first that gets our latest articles and to help us create more free plans.
Just to say great layout of plans and most helpful in numerous ways! Sincerely, M Parle.
Thanks you! Let me know how your projects come out!