

This step by step diy article is about gazebo plans free. Building an outdoor octagonal gazebo is a fun and easy project, if you use the right plans, techniques and materials. If you have a large garden and want to add a personal touch to its design or you just want a retreat, we recommend you to consider building a simple gazebo. An octagonal gazebo will enhance the look of your backyard and it is a great place to take dinner, during the hot summer days. Choosing the right plans for your needs might be a difficult task, but in this step by step diy article we show you how to build a eight-sided wooden gazebo.
The location of the outdoor gazebo is very important, therefore you have to pay attention to this aspect, otherwise you won’t be able to fully exploit its benefits. Go to the local building department, in order to make sure you comply with the legal regulations. Just imagine yourself reading a book, while watching your kids having fun in the garden. On the other hand, as in the case of any woodworking project, you have to take accurate measurements, otherwise the parts might not fit together properly
It is essential to use the right materials for the job, otherwise your outdoor gazebo won’t resist against the rain or snow. Therefore, we recommend you to use construction or deck redwood, cedar or pressure treated lumber, as they are designed for outdoor use. Last but not least, make sure you buy stainless steel fasteners, as ordinary screws and nails would cause stains.
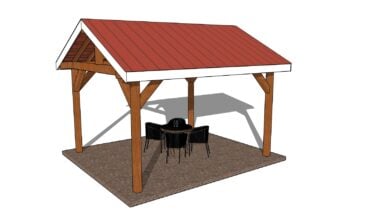
Made from this plan
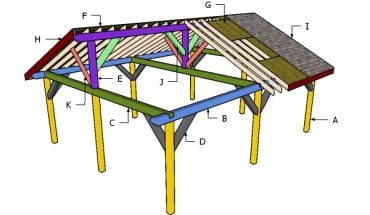
In order to build an octagonal gazebo, you need the following:
Materials
- A – 9′ long 4×4 lumber – POSTS
- B – 4” long nails / screws – SCREWS
- C – tube forms, concrete – FOOTINGS
- D – 2×6 lumber – JOISTS
- E – 2×4 lumber – DECKING
- F – 2 1/2” screws – DECKING SCREWS
- G – 2×4 lumber – RAFTERS
- H – 3/4” plywood, shingles – ROOFING
- I – 2×4 lumber – RAILS
- J – 2×2 lumber – BALUSTERS
Tools
- Safety gloves, glasses
- Circular saw
- Hammer, spirit level, carpentry pencil
- Posthole digger, ladder
- Power mixer
Tips
- Lay out the outline of the gazebo is a professional manner, using batter boards and string
- Use adjustable post anchors, to secure the posts into place
- Plumb the posts using post level clips (a level that reads in both directions simultaneously)
Time
- Two weekends
Related
Octagonal Gazebo Plans

Free Gazebo Plans
Building an octagonal gazebo is a beautiful project as it is a great opportunity to enhance the look of your garden, but also to learn new carpentry techniques. Plan everything from the very beginning, starting with the size of the gazebo up to the materials needed for the project.
Smart tip: Drill pilot holes in the components before inserting the screws, to prevent the wood from splitting. In addition, secure the intermediate joists to the main joists, using metal hangers. Plumb the posts before securing them with the lag screws.
Installing the wooden posts

Anchoring the post into concrete
There are many types of foundation you could use when building a gazebo, starting with a sturdy concrete slab up to using skids. While the fist solution is ideal for permanent constructions, the second alternative is recommended if you want to move the gazebo.
Therefore, you have to place the skids on concrete footings, as in the image. For extra rigidity, you could dig 2′ deep holes, fill them with concrete and install appropriate anchors.

Gazebo footings
First of all, you have to set the layout of the octagonal gazebo on the construction site. Therefore, we recommend you to use batter boards and string. Although it might look complicated to set the layout, it is actually easier than you think.
Therefore, consider the octagon as a 12′ square with cut off corners. Use the 3-4-5 rule to make sure the corners are right angled and make sure the diagonals are equal.

Plumbing the wooden posts
Next, dig deep holes (at least 3” to 6” below the frost line), pour a 3” thick layer of compacted gravel and set a tube form. Afterwards, you have to prepare a small quantity of concrete and fill the form, making sure you also install the adjustable post anchors. Use a straight edge and a spirit level, to make sure all footings are aligned.
Smart tip: Plumb the posts with a spirit level and brace them on two sides, before inserting the screws.

Installing octagonal gazebo posts
Install all eight posts, in the same manner described above. It is essential to anchor them properly, otherwise the outdoor gazebo won’t look too good. Therefore, you have to use a spirit level and brace the posts, before driving in the 3” long screws.
Smart tip: If you use adjustable post anchors, it will be easier to set the posts at the same level, therefore it’s the optimum solution to your needs.
Gazebo plans free

Fitting the wooden joists
Building the floor of the gazebo is not difficult if you use the right plans. Therefore, you have to install 2×6 floor joists, as in the image. Use metal joist hardware to lock them into position and drive in several screws. If you don’t have metal hangers, you should toenail the joists (drill pilot holes and install 4” screws).
Smart tip: Install a concrete footing in the center of the gazebo, to support the weight of the floor. Use a spirit level to ensure the floor is perfectly horizontal.

Installing decking to the joists
Afterwards, you have to install 2×4 or 2×6 decking boards over the floor frame. The main joists are not enough to support the decking, therefore we recommend you to install rims and intermediate joists at middle of the main joists. Trims the boards with 22 1/2º.
Lock the rims and intermediate joists into position, by toenailing them with 6” long screws. Everything should fit easily, without applying too much force.

Installing decking
If you use nails, we recommend you to drill pilot holes, otherwise the wood might split. Insert two nails / deck screws at both ends of the boards, as in the image. Remember that the decking boards should join exactly over the middle of the joists, as in the image.
Smart tip: Notch the first row of decking, to fit around the wooden posts of the gazebo. Use regular boards to space the boards (to leave a 1/8” expansion gap between the decking boards).

Building gazebo frieze
After you have installed the floor of the outdoor gazebo, using our free plans, you should build the frieze. This decorative element is optional, but we recommend you to consider building a frieze from 1×4 or 2×4 lumber, if you want to obtain a unique look and a unforgettable design.
Smart tip: When designing the frieze, you should get the inspiration from the elements of your house, or try to match it with the gazebo railings.

Gazebo frieze
Use 2×4 wooden boards to build the bottom and top rail of the frieze and 1×1 redwood to build the small balusters. Work with great care and attention, ensuring that everything fits into place and has a neat look.
In order to fix the balusters, you have to drive nails through the bottom and top rail in the balusters. Alternatively, you could also toenail them, but you have to fill the screw holes with wood putty.

Gazebo frieze plans
In order to get the job done in a professionally manner and quickly, we recommend you to assemble the frieze on ground level (after you took accurate measurements) and then install them into place by toenailing the top and bottom rail to the 4×4 posts.
The frieze can take many shapes, designs and dimensions, but you should choose the one that fits your needs and tastes best.
Outdoor gazebo roof plans

Installing the rafters
Build the rafters from 2×4 lumber, cutting the ends at about 25º. Afterwards, attach two rafters to opposite sides of the kingpost. Center this assembly, making sure the rafters are placed on top of the posts. Drill pilot holes through the rafters and insert 4” screws into the posts and into the kingpost.
After installing the rafters into place, you can braces from the posts.

Gazebo roof plans free
Use a table saw to cut off the octagonal kingpost using a 4×4 post, or buy one from your local diy store. Next, use 2×4 rafter and install them into position, as in the image. The technique is straight forward: first, install two rafters on opposite sides of the kingpost, then the rest of the rafters.
Drill pilot holes and install several 4” screws. As you can see in the image, the rafters should overhang about 6-10”.

Installing the roofing sheets
Next, install 3/4” tongue and groove plywood sheets into place. Cut the sheets with a good circular saw (use a blade with fine teeth) and secure them to the rafters, every 6” (use 2” screws).
On the other hand, you could also get the done done by installing 2×6 boards, as in the plans. If you choose this solution, you won’t have to install shingles at all. Just make sure to treat the slats with appropriate products, against rot.

Installing the asphalt shingles
After getting this step done, you should install the asphalt shingles. Therefore, start the installation from the bottom of the roof, after fitting the drip edges. Nail the shingles with several roofing nail, leaving about 1” from the edge.
Pay attention when installing the ridge caps, as a poor installation would allow water to damage the roof sheeting. Cut shingle tables with a cutter, in order to build the ridges.

Fitting the bottom rails
Afterwards, you should build the railings of the gazebo. As you probably imagine, the railings can take many shapes, designs and dimensions, therefore you should plan them as to fit your needs and tastes.
First, you should install the bottom rail, using 2×4 redwood. In order to lock them into position, you could either toenail them with 4” screws, or use corner brackets.

Installing the top railings
Next, use 2×4 redwood boards and build the top rail of the outdoor gazebo. Work with great care as to take accurate measurements and cut them using a table saw or a circular saw. Place the top rail about 28-32” from the bottom rail, according to your needs and tastes.
Smart tip: When installing the top rail, make sure you use a spirit level, otherwise the railings won’t have a neat look.

Gazebo railings
Use 2×2 redwood to build the balusters, as in the image. First, you have to cut them to the right dimensions and afterwords lock them into position. The balusters should be placed every 2-4” and they should be equally spaced (use a piece of wood as spacer, to get consistent gaps).
In order to secure them, you could either drive in screws through the rail in the balusters or toenail them using 3-4” screws.

Free gazebo plans
Continue installing the balusters until you get the job done. Work with great care and good judgement to prevent any error. If you like to add a personal touch to the outdoor gazebo, we recommend you to consider using 2×6 slats to build the railings, instead of the 2×2 balusters.
As we have already said, it is essential to match the design of the balusters with the design of the frieze, otherwise the wooden gazebo won’t have a neat look.

Octagonal gazebo plans
If you don’t want to drive in nails through the top railings, you could also use 1×1 redwood molding as nailing cleats. Afterwards, don’t forget to fill the holes with wood putty. Let the compound to dry out properly, before sanding the components along the wood grain.
Smart tip: Protect the octagonal gazebo from rot, by applying several coats of wood stain. Use only stainless steel screws and fasteners.
Thank you for reading our article about gazebo plans free and we recommend you to check out the rest of the plans. Don’t forget to share our projects with your friends, by using the social media widgets.
Related projects:

please send a 14′ round gazebo if you
Great step by step plans, unfortunately, the material list does not list any quantities.