
This diy step by step article is about wooden planter plans free. Building a wooden planter should be an easy project even for an amateur handyman. In addition, you need common materials, therefore you could even reuse lumber, if you want to obtain a rough appearance. In this article we show you how to build a wooden planter in just a few hours, while keeping the total costs of the projects at a decent level. As in any other woodworking project, you have to measure the lumber properly and use professional power tools to make the cuts accurately.
There are many design and styles you could select to build a deck planter, but you should choose the one that fits your needs and tastes. After you have selected the design, you have to decide the size of the planter, according to the flowers you are going to use inside the wooden box. Therefore, you have to know from the very beginning these aspect, otherwise you will keep adjusting the size during the woodworking project.
Choosing the right lumber for this project is essential, if you want to obtain a professional appearance. Consequently, choose lumber that looks good and is not prone to cracks or shrinkage, and it is designed for outdoor use. If you want to save money on this project, then you should buy dried pressure treated lumber that offers the best benefit to cost ratio. Make sure the boards are perfectly straight and in good condition before buying them. See all my Premium Plans in the Shop.
Made from this plan
Materials
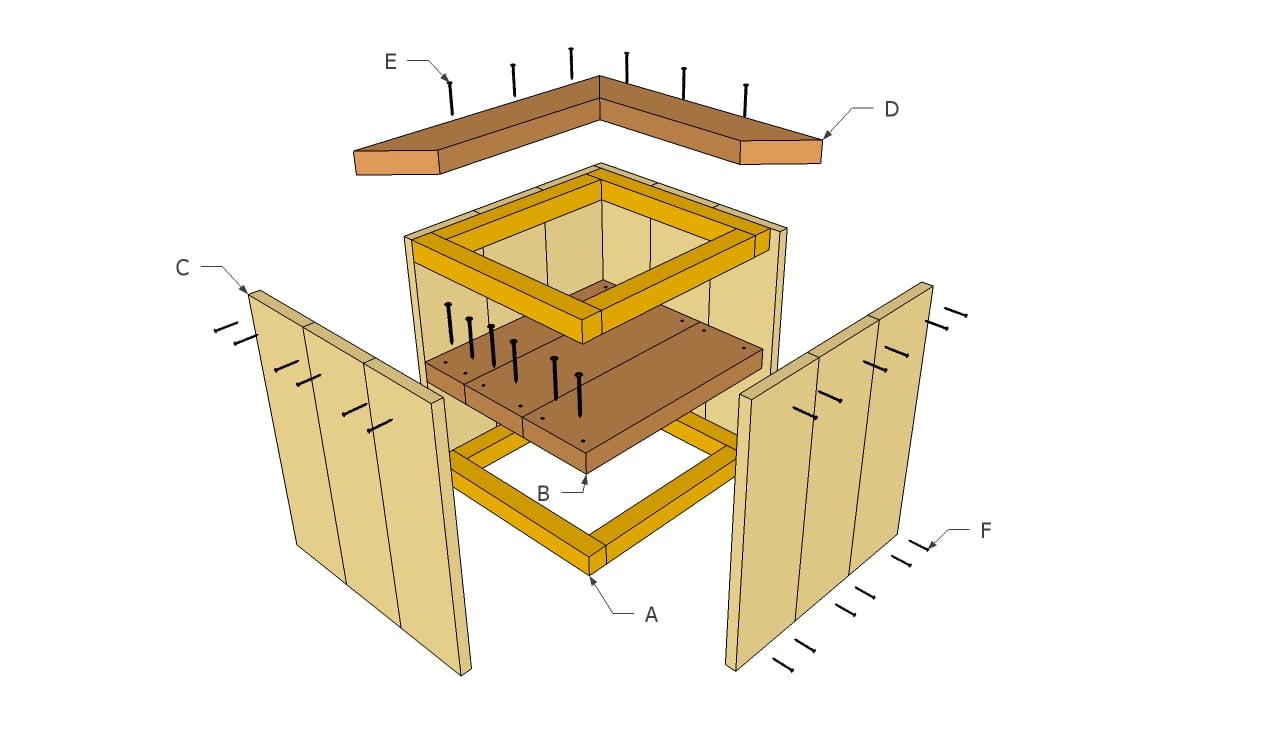
- A – 4 pieces of 2×2 lumber 15” long; 4 pieces of 2×2 lumber 13 1/2” long FRAME
- B – 3 pieces of 1×6 lumber 15” long FLOOR
- C – 12 pieces of 1×6 lumber 18” long SIDE WALLS
- D – 2 pieces of 2×4 19” long; 2 pieces of 2×4 20 1/2” long (cut at 45º at both ends) TOP TRIM
- E – 3” decking screws SCREWS
- F – 2-2 1/2” wood screws SCREWS
- 1 piece of 2×2 lumber – 10 ft
- 3 pieces of 1×6 lumber – 8 ft
- 1 piece of 2×4 lumber – 8 ft
- 2 1/2″ screws
- 1 1/4″ screws
- glue, stain
- wood filler
Tools
- Safety gloves, glasses, Miter saw
- Chalk line, tape measure, spirit level, carpentry pencil
- Drill machinery and drill bits
- Router, 1/4” round bit – optional
Tips
- Smooth the edges of the wooden boards, with a router
- Pre-drill holes in the wooden components, before driving in the screws
- Align the components before locking them into place
- Don’t use lumber that is likely to crack or shrink
Time
- One day
Related
Wooden Planter Plans

Wooden planter plans
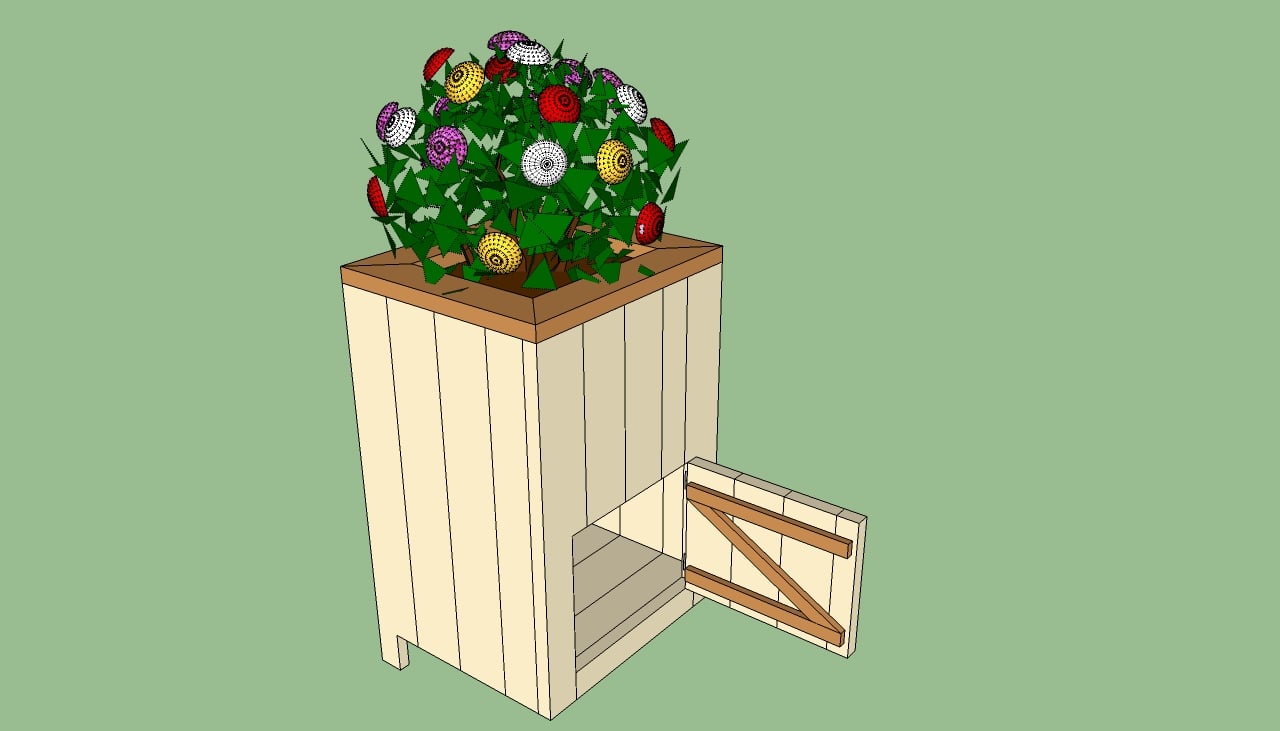
Building a wooden planter should be a simple project for any diy enthusiast, who want to add a little color to their decks or patios. In this article we show you a step by step guide to get the job done quickly and in a professional manner.
How To Build a Wooden Planter

Planter frame plans
First of all, you have to build the frame of the wooden planter, using several pieces of 2x2s. After you have cut the pieces to the right size, you have to lock them together with 3” screws. Build two identical frames, using our free plans.

Installing the bottom of the planter
Afterwards, you have have to build the floor of the planter from 2×6 lumber. If you will use the same dimensions as our plans, you should cut three 2×6 pieces at 16 1/2”, using a miter saw.

Building the walls of the planter
The next step of the project is to build the side walls. Therefore, you have to cut 12 pieces of 1×6 lumber at 18” (you could adjust of the wooden planter, according to your needs).
If you want to obtain a professional result, we recommend you to buy tongue and groove 1×6 lumber, as there won’t be any gaps between the boards. Fasten the boards to the 2×2 frames, at the top and bottom, with 2 1/2” wood screws. Align the components accurately, before inserting screws.

Top trim planter plans
Next, you have to build the top trim, from 2×4 lumber. Firstly, you have to cut the four wooden boards at the right size. Next, you have to cut their ends at 45º, by using a miter saw. Round the edges of the planter with a router (1/4” bit), to enhance the planter.
Attach the top trim to the wooden planter and secure it with finishing nails. Center the component properly, otherwise it won’t look symmetrically.

Flower Planter Plans
Afterwards, you should sand the wooden surface with 120-grit sandpaper and fill the holes and cracks with wood putty. After the filler has hardened, you have to smooth the surface with a sand block.
Thank you for reading our article about wooden planter plans and we recommend you to check out the rest of our articles. Don’t forget to share our articles with your friends, by using the social media widget.
