
This article is about how to wire and install an electric outlet. Generally speaking, there are many types of electric outlets on the market, according to the geographical area. The electrical outlets vary in form, dimension and according to the type of connection. In Europe the most used electric outlet is the so-called Schuko, as in North America the standard socket used is the NEMA 5-15,with two flat parallel blades plus a grounding blade.
Nevertheless, there is an universal classification of the electric sockets: earthed and unearthed. However, in this article we will show you how to wire and install a Schuko outlet, in a diy step-by-step project.
In order to install the Schuko socket, you need the following:
Materials:
- electric outlet
Tools:
- safety gloves
- safety glasses
- utility knife
- measuring tape
- pliers
- screwdriver
- voltage tester
Tips:
- turn off the power for all circuits of your house
- before touching any wire, use a voltage tester on every single wire of the outlet, to make sure the power is turned off
- installing a socket is not an easy job, so if you don’t want to assume the risks it is better to hire a certified professional
How to wire a Schuko outlet

Turning the power off
The first thing you should do is to turn the power off. Some persons consider that is safe to turn off only the circuit on which you wire and install the outlet, but we highly recommend you to turn off the power for all circuits in your house, as you can never be too pro-active when dealing with electricity.
Next, use the voltage tester on each wire as to make sure it is safe to touch them. Again, we should always verify several times before touching the electrical wires.

Cleaning the paint and drywall mud of the junction
The next step of the project is to clean the paint, residues or drywall mud from the junction box, using a pair of pliers. Make sure you have removed all materials that are in the junction or over the screw holes of the junction box. This operation is important, especially if you deal with a new-built house or a repainted room.
However even if you are replacing an old socket it is better to asses the junction box, as to make sure the new electric outlet could be installed and aligned properly.

Schuko socket
In this image you can see the electric outlet we will wire and install in the junction. It may look strange for many of you, as it is a typical European socket, called Schuko, which is an earthed outlet.
This is a very safe electric outlet, as it is grounded, and it is used in all new houses in Germany, and in most EU countries.

Dissembling schuko outlet
After you have bought the right socket for your needs you have to dissemble the outlet, by using a screwdriver. This operation is essential as you will connect the electric wires to inner part of the outlet.
Consequently, unscrew all the screws placed on the socket cover, with a screwdriver.
Smart tip: rotate the screwdriver anti-clockwise.

Schuko socket parts
If you performed the prior operation correctly, this is how your outlet should look; you should get two main parts: the outlet and its cover.
The main outlet is the component we will need in the following stages, so you can leave the cover aside for a little while, until we finish wiring the Schuko outlet.
Smart tip: leave the screws in the outlet cover, as to prevent loosing them.

Cutting electric wires to the right dimension
Now that we have dissembled the electric outlet, it is time to start wiring the socket. Consequently, use the pliers to cut the wires at about 7”/15 cm past the wall.
This length should be enough as to be able to wire the outlet, but in the same time to fit inside the junction box without any difficulty. Remember that you don’t have to leave the wires too long, as they might not fit in the junction box, and you have to redo the operation.

Installing the electric wires in the outlet
After we made sure the wires are cut at the proper dimension we proceeded to the next step. Subsequently, we used the pliers to strip about 1”/2.5 cm of wire insulation of the wires.
Smart tip: the easiest and the most efficient method to strip the insulation is to use wire strippers. In addition, you should select the correct wire size on the stripper gauge.

Stripping the wires outer jacket
Next, use the pliers to bend the wires end in a l-shape (or in a c-shape if the socket has a different locking system), as in the image.
However, you have probably noticed that the wires are colored differently: the brown wire is the phase, the blue wire is the neutral and the green-yellow wire is the grounding. The electric color code is different from country to country.
Each of this wires has to be installed in a specific slot of the outlet.

Installing the phase wire (brown) on the side of the outlet
Consequently, the ground wire should be installed on the median of the socket, usually at the bottom of the socket.
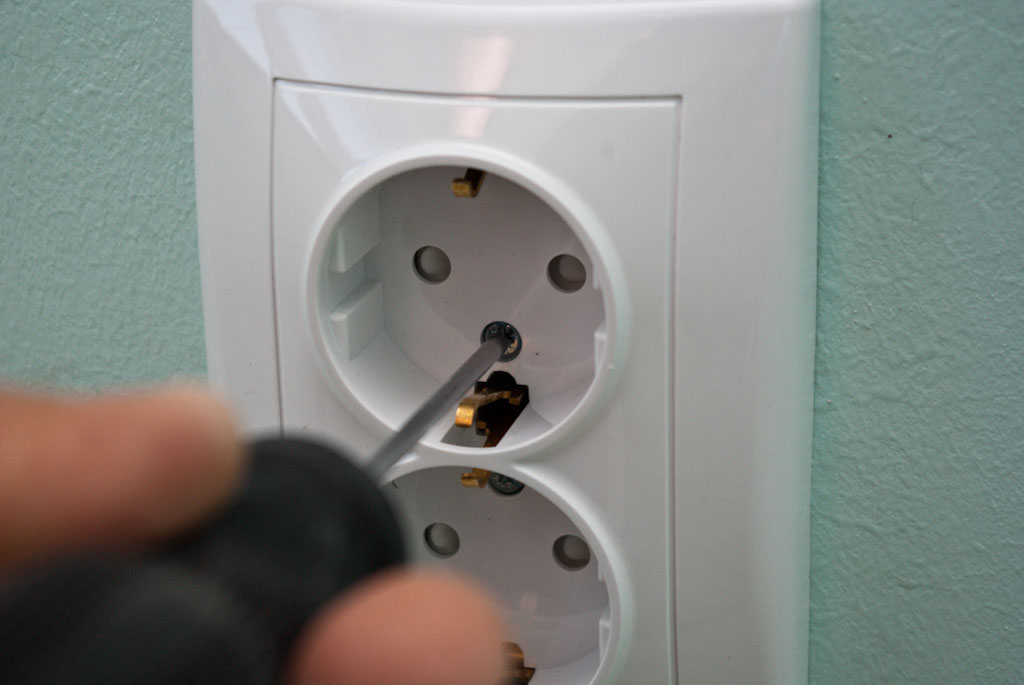
The neutral connection may be different according to the brand or the type of the socket, but in our case, we could install the neutral wire either on the left or on the right of the outlet. After you place the wire end in the proper place, lock it in the position by driving in the screw.
The phase wire should be connected on the opposite side of the neutral connection, and then it should be fixed in the same way.
How to install a Schuko outlet

Installing the outlet in the junction box
After you have wired the outlet, you should bend the wires as to fit perfectly in the junction box. Afterwards, push the output gently in the box, as to make a first try to see if the outlet has enough room to be locked into position.
If there are no issues, you can fasten loosely the outlet in the junction box, with screws. The reason why you shouldn’t lock it too tightly is that we have to make sure the outlet is well aligned.

Using laser level to align the outlet
In order to level the electric outlet, we usually use a laser level, but you can also use a spirit level, it will just make the process a little more difficult, especially for beginners.
Make sure the laser level is properly set and check if the outlet is aligned. If you notice that the outlet is not level, unscrew it and then adjust its position until it is right. Afterwards, fix it again into the junction box, by driving in the screws clockwise.

Installing the outlet cover
One of the last steps is to fix the output cover on the wall. Fortunately, this operation is plain simple and also it doesn’t require more than a few minutes.
Just place the cover on the outlet and fix it with the screws.
Smart tip: you should also use the laser level, as to make sure the cover is plumb.

Fastening the outlet cover with screws
Use the screwdriver to attach the cover into the output, with clockwise moves. Be careful and do not tighten the screws too much, as you could damage the cover (it might crack).
After you have finished installing the outlet, just go to the electric panel and turn on the power. Use a tester to see if you have the right voltage from the phase to the neural and from the phase to the ground. In addition, check the voltage between the ground between the ground and neutral – it should be [0-1].
Thank you for reading our article on how to install an electric output, and we recommend to check out the rest of our projects. Don’t forget to share our you to share our articles with your friends on Twitter, Facebook and Google Plus.
Related projects:

