

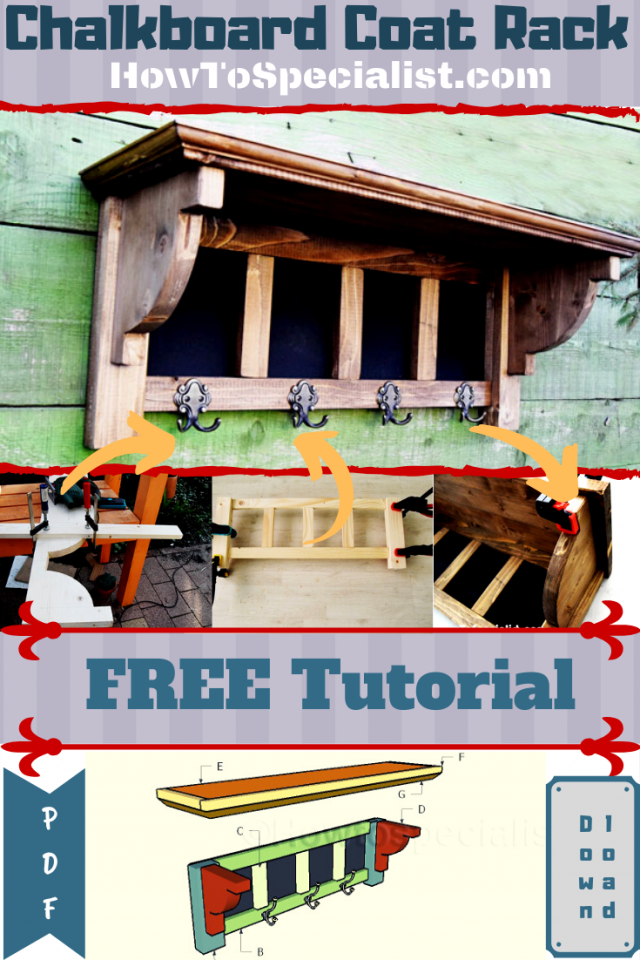
This step by step woodworking project is about how to make a wall mounted coat rack. Although I don’t really need another coat rack for my home, I had some chalkboard paint left from my other projects so I had to put it to use creatively. Since I like working with lumber and building projects, this was the perfect opportunity to spend time outdoor and to create a beautiful design for the wood coat rack with shelf. See my other chalkboard project for more DIY inspiration.
We recommend you to invest in the best materials you could afford. Therefore, you should buy weather-resistant lumber, such as pine or cedar. Always take accurate measurements before adjusting the size of the components at the proper size. Drill pilot holes trough the components before inserting the wood screws, to prevent the wood from splitting. There are even concrete log holders out there, but I personally like to show you how to build a wood fireplace log holder. See all my Premium Plans in the Shop.
Made from this plan
Building a wall mounted coat rack
Materials
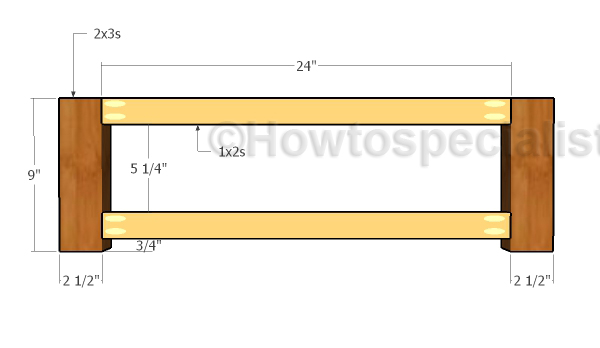
- A – 2 pieces of 2×3 lumber – 9″ long SUPPORTS
- B – 2 piece of 1×2 lumber – 24″ long SUPPORTS
- C – 3 pieces of 1×2 lumber – 5 1/4″ long PARTITIONS
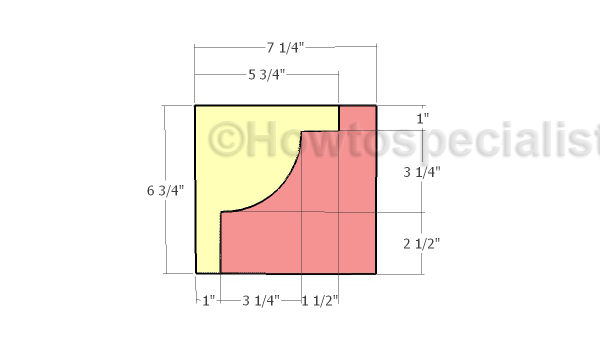
- D – 2 pieces of 2×8 lumber – 6 3/4″ long SUPPORTS
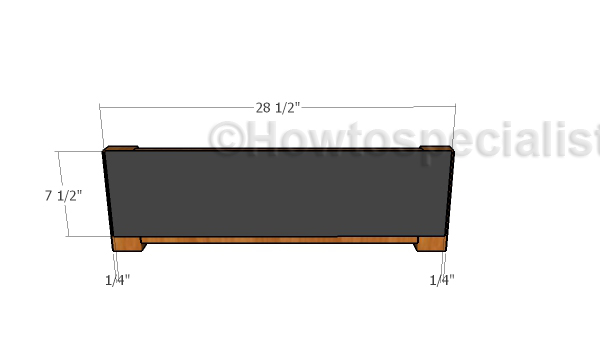
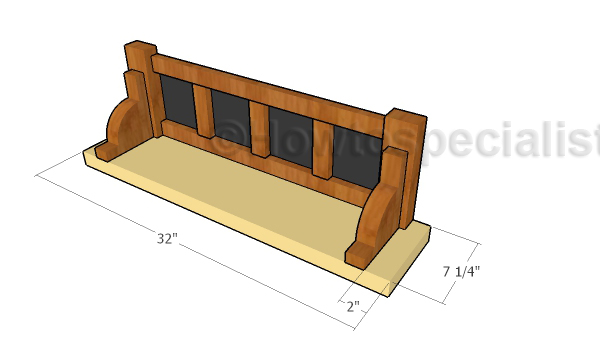
- E – 1 piece of 2×8 lumber – 32″ long TOP
- F – 2 pieces of 3/4″ trims – 8″ long, 1 piece – 33 1/2″ long TRIMS
- G – 1 piece of 3/4″ plywood- 7 1/2″x28 1/2″ long PANEL
- 1 piece of 2×3 lumber – 6′
- 1 pieces of 1×2 lumber – 6′
- 1 piece of 2×8 lumber – 6′
- 1 piece of 1/4″ plywood of mdf – 2’x4′
- 100 pieces of 1 1/4″ brad nails
- 50 pieces 1 1/4″ screws
- 10 pieces of 2 1/2″ screws
- 4 hooks
- stain, glue
- chalkboard paint
Tools
- Safety gloves, glasses
- Miter saw, jigsaw
- Chalk line, tape measure, spirit level, carpentry pencil
- Drill machinery and drill bits
Time
- One Weekend
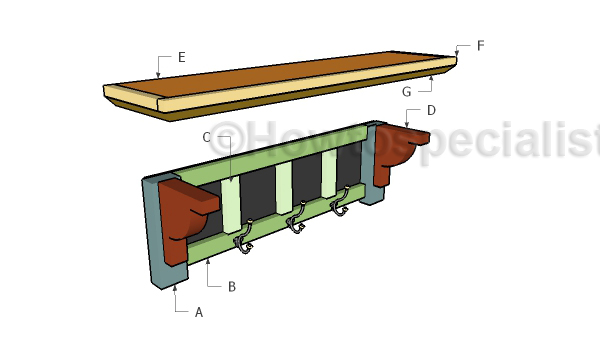
Coat Rack Plans
Building the frame of the coat rack
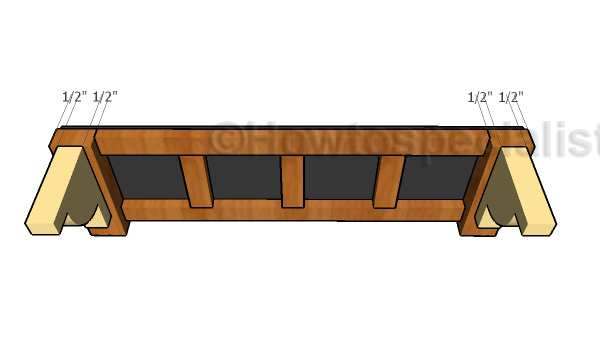
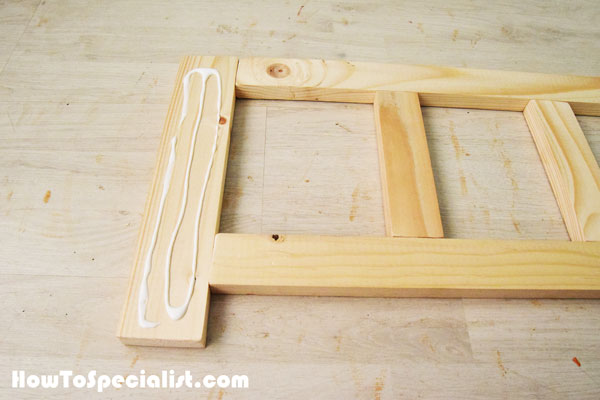
First of all, you need to assemble the frame of the coat rack. Use 2×3 lumber for the vertical supports and 1×2 lumber for the horizontal supports. Drill pocket holes at both ends of the 1×2 slats and secure them to the vertical supports with 1 1/4″ screws. Add glue to the joints and make sure the corners are square.

Fitting the partitions
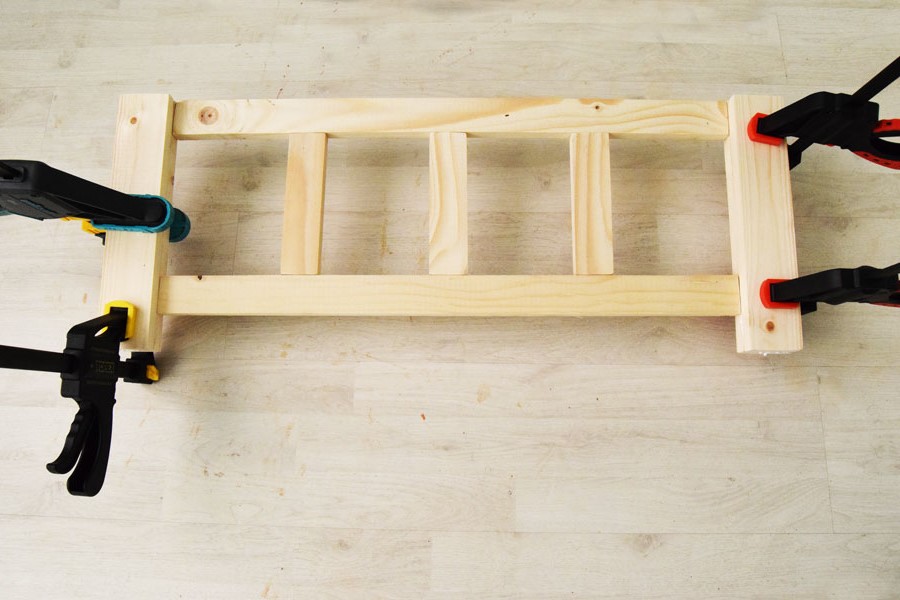
Fit the 1×2 partitions to the frame of the coat rack. Place the partitions equally spaced. Drill pocket holes at both ends of the partitions and secure them into place with 1 1/4″ screws.
Fitting the back panel
Attach the 1/4″ plywood or mdf panel to the back of of the coat rack frame. Apply chalkboard paint over the panel before attaching it into place with nails.
Building the supports
Build the supports for the top from 2×8 lumber. Mark the cut lines on slat and get the job done with a jigsaw.
Fitting the supports
Fit the supports to the frame of the wall mounted coat rack, drill pilot holes and insert 2 1/2″ screws to lock them into place.
Fitting the top
Center the top component to the frame of the coat rack, making sure the overhangs are equal. Drill pilot holes through the top and insert 2 1/2″ screws into the supports.
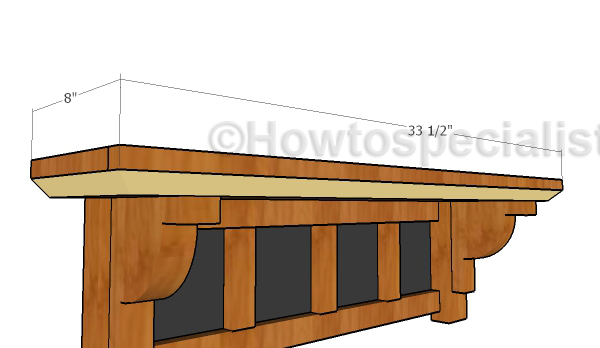
Fitting the trims
Attach trims to the exposed edges of the top slat. Cut the trims at 45 degrees and lock them into place with glue and brad nails.

Fitting the coat hangers
Fit the hooks to the coat rack with screws.
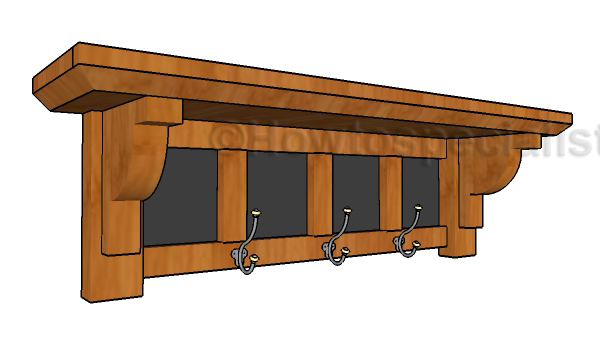
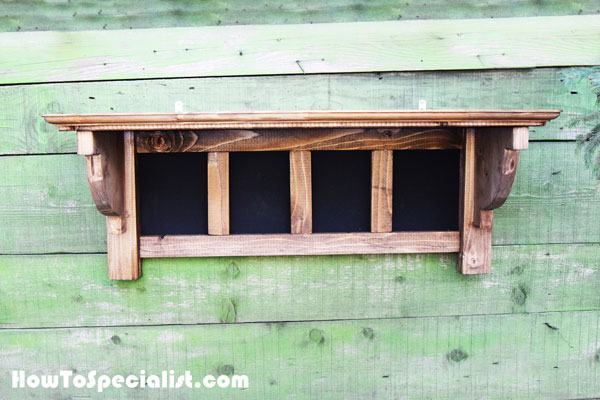
Wall mounted coat rack
Fill the holes with filler and let them dry out for a few hours. Smooth the surface with 120-220 grit sandpaper and then apply the stain coats. Make sure you mark the chalkboard panels or apply the stain before assembling the coat rack.
How To Make a Wall Mounted Coat Rack
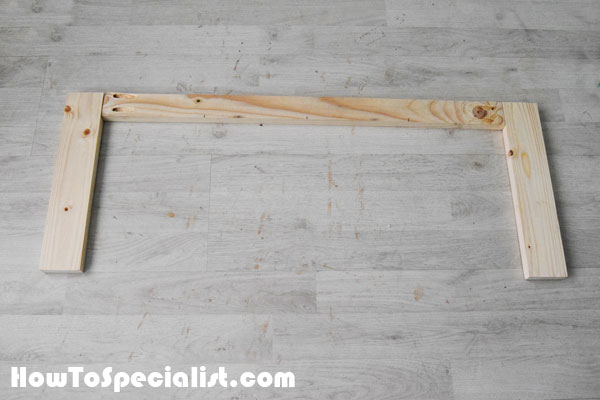
First of all, I assembled the frame for the coat rack. I had some 1x3s left from other projects, so I didn’t see any point in buying 2x3s. You can see how I glued two pieces of 1×3 lumber to get a 2×3 for the vertical back supports.
I drilled pocket holes at both ends of the 1×2 supports and inserted 1 1/4″ screws into the side supports. I aligned the edges with attention and made sure the corners were square before inserting the galvanized screws.
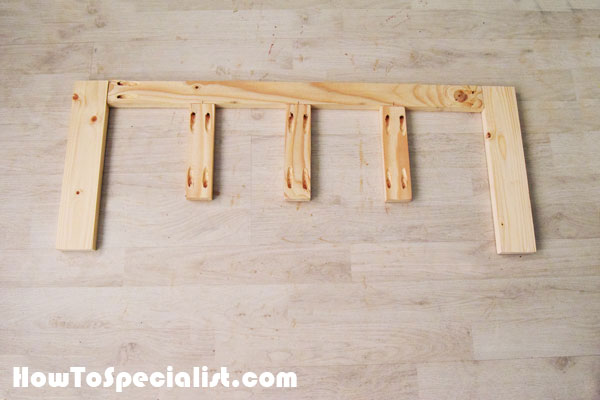
Next, I installed the 1×2 partitions to the frame. This step is tricky, as you need to make sure the corners are square and the supports equally-spaced. Add glue to the joints.

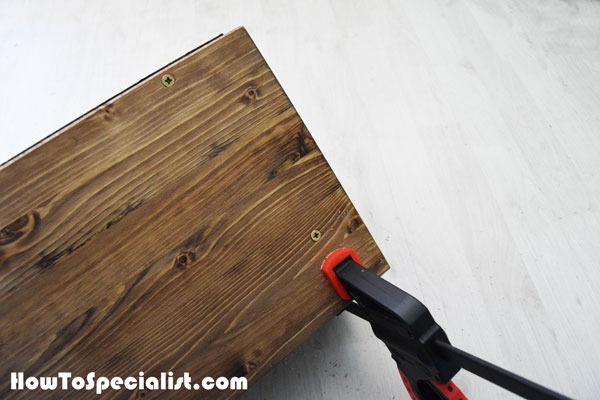
Fit the bottom support to the frame of the coat rack. I used clamps to secure the components into place, while inserting the 1 1/4″ screws.
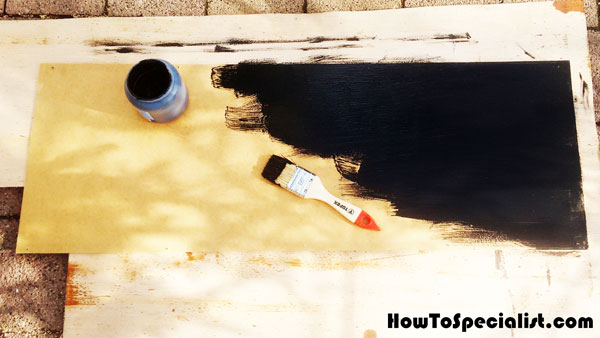
Next, I applied the chalkboard paint over the 1/4″ MDF panel I had left from other projects. I use a brush to apply and even coat of paint over the surface. The chalkboard paint dries out quickly, so I only had to wait for 30 minutes before applying the second coat.
Add glue to the side supports, so you can attach the other 1x3s.
Next, I attached the 1×3 pieces to the side supports. I aligned the edges with attention and added glue to the joints. I clamped the supports together for a few hours. If you use 2×3 lumber for the side supports, you can skip this step completely.
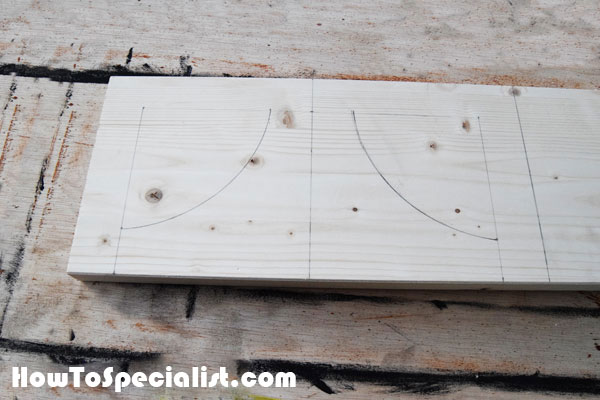
I marked the cut lines on the 2×8 lumber with a pencil. I used a large round object to trace the curved lines.
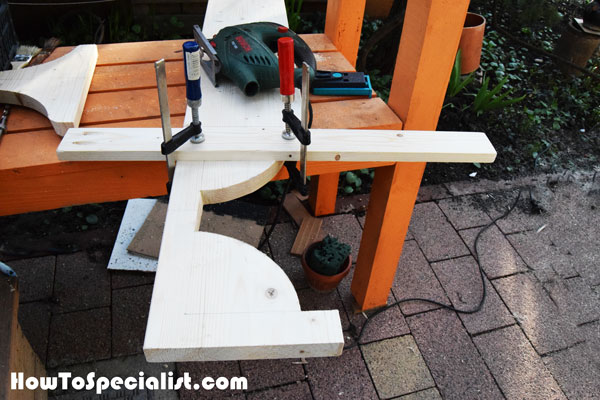
I used a jigsaw to make the cuts, making sure the blade goes over the cut lines. I used 120-220 grit sandpaper to smooth the edges. This step is very important, especially that I will apply stain, which will leave the wood grain exposed.
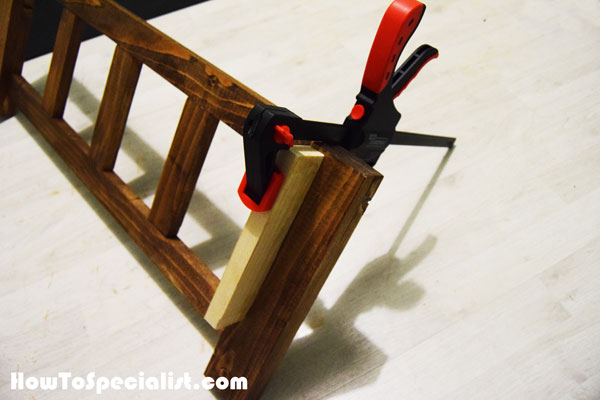
The next step of the project was to attach the supports for the top to the frame of the coat rack. In order to center the supports to the frame of the coat rack, I clamped a piece of 1×2 lumber into place. I made sure the cleat was flush with the frame of the coat.
Next, I clamped the supports to the cleats, as you can see in the image. I aligned the top edge of the supports with the frame of the coat rack.
I drilled pilot holes through the frame of the coat rack and inserted 2 1/2″ screws into the top supports. Work with attention, otherwise you might risk splitting the wood.
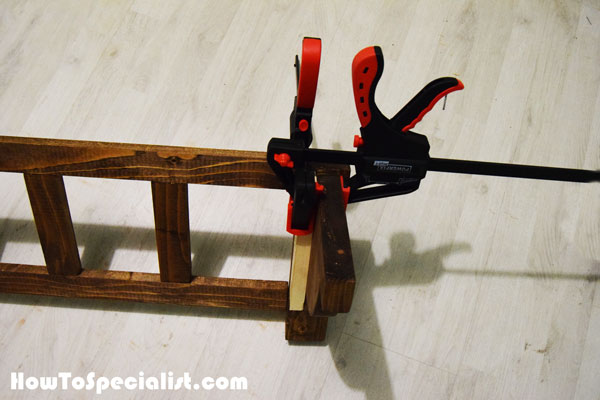
After attaching the other support, my coat rack was starting to take shape quite nicely. It already started to look with my 3D model, which was encouraging.
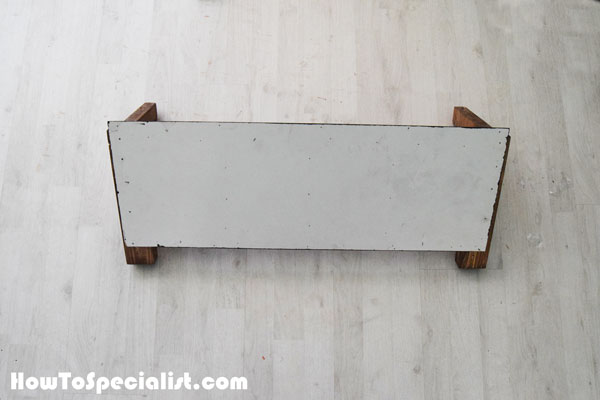
I attached the chalkboard panel to the back of the coat rack. I aligned the panel with the bottom support and secured it into place with 3/4″ brad nails. I inserted the nails every 4″.
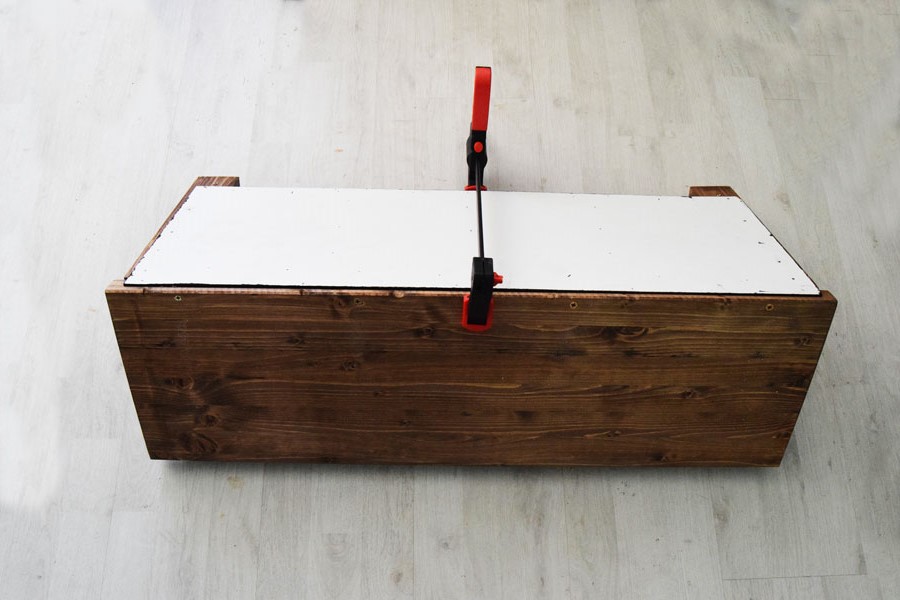
Next, I clamped the top piece to the frame of the coat rack. I centered the top to the frame, so the side overhangs are equal. I drilled pilot holes through the top and inserted a few 2″ screws into the frame of the wall mounted coat rack.

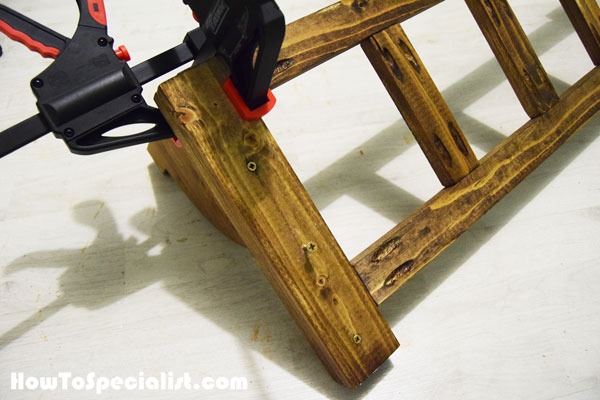
It was then time to attach the top to the side supports. I used a tape measure to make sure the overhangs were even from one end to the other. Once I aligned the supports I used clamps to lock them into place temporarily.
I drilled pilot holes through the top and inserted 2 1/2″ screws into the supports. As you can see in the diagram, the head of the screws are flush with the surface.
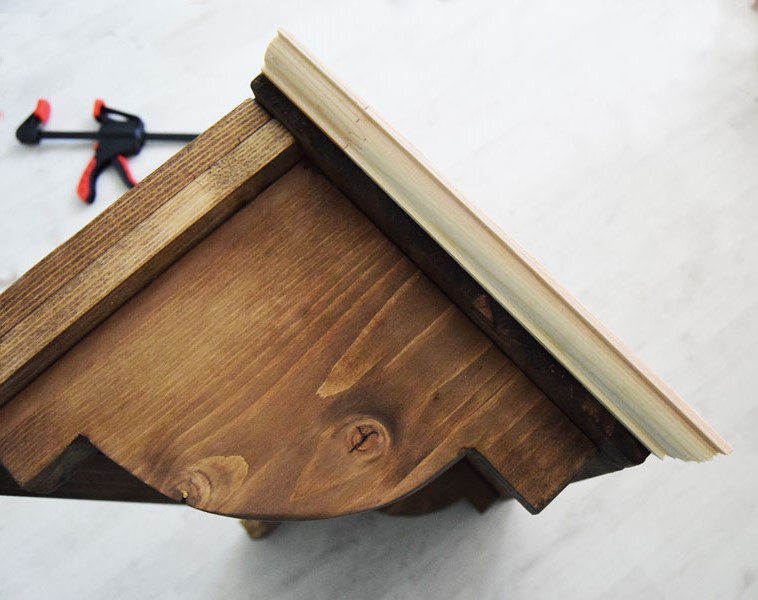
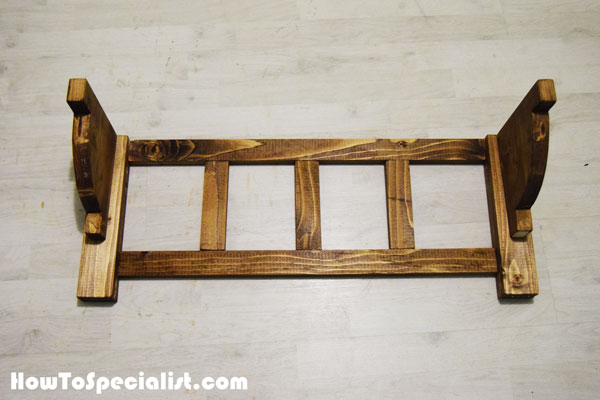
I added trims to the edges of the top component, so I enhance the look of my coat rack. I cut the ends that join together at 45 degrees, using my miter saw. I used glue to secure the trims into place, making sure the edges are perfectly aligned.
Fit the rest of the trims to the top of the coat rack, so you enhance the look of the project. Leave no gaps between the trims and the frame of the coat rack for a professional result.
I applied a coat of stain (walnut) to the trims. I liked the color and applied a second coat would have darkened the surface, so I leaved it that way. I used a spirit level to make sure the coat rack was perfectly horizontal.
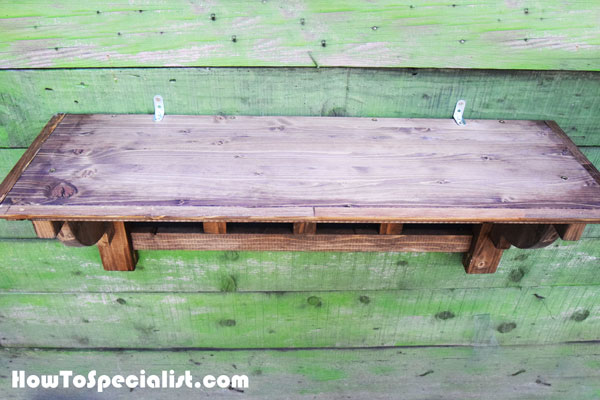
I used small brackets to hang the coat rack temporarily to the wooden wall. You can also drill pilot holes and insert the screws through the framing into the studs, but I think it will hinder the look of the project, so I recommend using brackets.
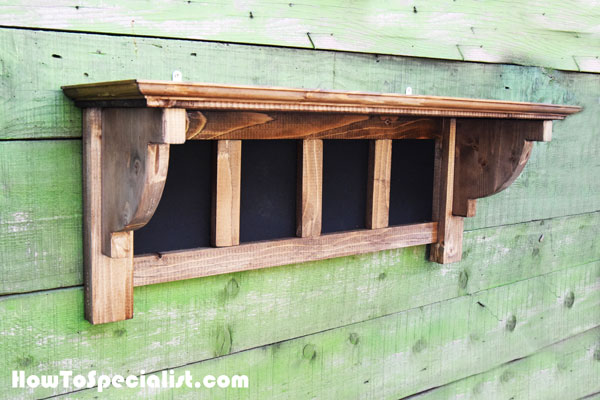

I attached the antique coat hooks to the wall mounted rack. I used a tape measure and a pencil to mark the middle of each partition, for a symmetrical result.

Now that my coat rack is ready, I took a few more pics so you can see it from several angles. I am happy with my project and with the end result. The few afternoons I have been working on this project were worth is. The coat rack with shelf turned out exactly how I wanted and I cannot be more pleased with the result.
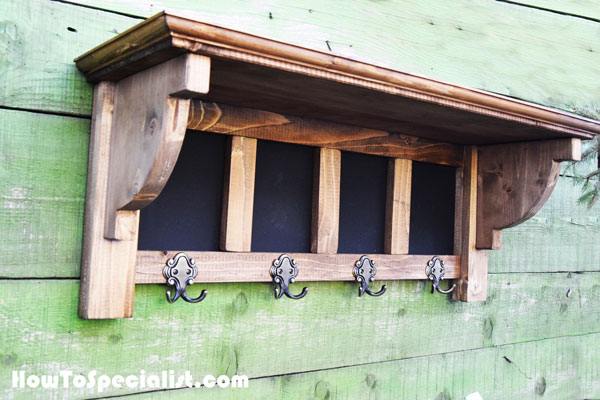
All in all, this project only cost me 15 dollars to make, considering I already had the chalkboard paint from another project. It was a great and fun weekend project which challenged me to come with an design unlike anything else out there. This is one of my favorite projects to date, as it has a very elegant look to it. If you like my coat rack, don’t forget to SHARE it on Facebook and Pinterest. Since you are here, I recommend you to take a look over my farmhouse cabinet project.
Thank you for reading our project about how to make a coat rack and we recommend you to check out the rest of the projects. Don’t forget to LIKE and SHARE our projects with your friends, by using the social media widgets. SUBSCRIBE to be the first that gets our latest projects.
